OP
OP
Bgagnon127
TPF Noob!
- Joined
- Apr 17, 2011
- Messages
- 269
- Reaction score
- 7
- Location
- Rhode Island
- Website
- www.briangagnonphotography.com
- Can others edit my Photos
- Photos OK to edit
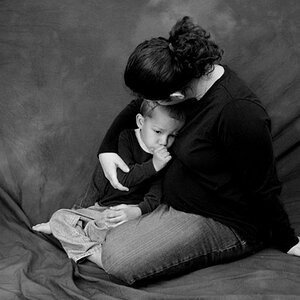
I have to purchase a couple of items to bring this to the next level I think. A bar stool so there's no backrest in the photo when I'm sitting on it, a real muslin background to get a larger coverage as well as a better texture, and few more light control devices such as a snoot or grid spots like you're saying. My space is a bit limiting but I agree that sitting may solve some of those issues. What other devices have you used to offset the feet (in a studio space like this) and therefore pose the body properly? Other than a bar stool, milk crate, small ladder?What do you think? Does it look more dynamic to you? As a viewer, do you feel more connected to the model? Does it provide you a reasonable likeness?Ok here goes, did I listen well?
It's really a matter of numbers, trial and error, mistakes after mistakes, slight adjustments here and there.
Okay, I see that you have plenty of length, but are somewhat limited on height. This is a good reason to find a chair to lower yourself, for the time being. This will also raise your lights, in essence, giving you more flexibility with positioning them. If I might make a few suggestions for your consideration.My setup.
with my current setup I have the key light about 45 deg off to the left of camera with a bounce umbrella which is just slightly above eye level. then i have an open head bouncing off the cieling to camera right for fill. then a speed light behind me on a low stand to hit the background but i guess not enough.
I would first move your position forward so that you are ~6 feet from the background. This will create a greater separation for you. Next, position your main light just out of frame to soften the light. The further away the light, the smaller it becomes. Obviously there are times when this is desired, but seldom in the type of shot you are attempting here. Having a separate fill light is great, but having it opposite the main cancels out the modeling (shadows) you've created with your main light. Try having it directly over the lens (height appropriate) to no more than ~18" on the same side as the main. If you have a wall behind you, you could even bounce the fill off that providing that it is white to avoid any color casting (bed sheet, poster board, is that a Lastolite trigrip reflector on the left of you setup shot?). IMO, the background light is not your friend here only because of the texture of the background material and it is set too low. Typically in the fashion you're using it, you would want it to be at the same height as your head.... or down low pointing up..... or up high pointing down.... or turned so that it firing at your head (this would give a nice rim light). But I think a better use is to have it ~135 degrees from the camera (opposite the main light) to highlight your hair to give separation from the background. You could add a snoot or grid to target a specific part of your head. It's amazing how much that little bit of light can add to an image. When you get more lights, you can use them to hit the background.
Keep at it dude, it looks like you want to do well. I think you will.
Also regarding what I think about the photo being more dynamic or a good likeness. Yes I think it's much more "natural" feeling and therefore more pleasing to look at. I also think the lines that are created by the pose of the arms and shoulders are bringing the eye around the photo pretty nicely. I would eventually like to get to the point where I can study a person and know what pose will be the most flattering for them, however right now I'm going to focus on lighting to try and get that better. Awesome feedback!

")
![[No title]](/data/xfmg/thumbnail/35/35264-5ade32b7036391926536661aeb7491c3.jpg?1619736969)
![[No title]](/data/xfmg/thumbnail/35/35263-86f580cf5d28d23109a45984030a79ad.jpg?1619736968)