Some of My Infrareds

DragonMoon

TPF Noob!
Joined
Jul 28, 2008
Messages
75
Reaction score
0
Location
Bristol, CT
Website
www.dragonmoonphotography.com
Can others edit my Photos
Photos NOT OK to edit
These aren't exactly landscapes so I posed them in the general gallery. One of my loves is evoking powerful feelings with a more dark-sided point of view.

The Watcher:
wallingfordcemetery9-16alternate.jpg


Uncropped:
wallingfordcemetery9-16.1.jpg

Exif - Tripod mounted Canon 20D w/ Canon EF-S 18-55mm f/3.5-5.6 @ 18mm, 30sec, f/8, ISO 200. Post processed in Photohsop CS2

Life's Journey:
wallingfordcemetery9-16.6.jpg

Exif - Tripod mounted Canon 20D w/ Canon EF-S 18-55mm f/3.5-5.6 @ 25mm, 30sec, f/7.1, ISO 200. Post processed in Photohsop CS2
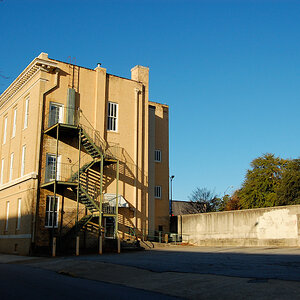
What Lies Beyond:
downstreetcemeteryir7-10.1hdr1.jpg

Exif - Tripod mounted Canon 20D w/ Canon EF-S 18-55mm f/3.5-5.6 @ 18mm, 48sec, f/8, ISO 400. Post processed in Photohsop CS2
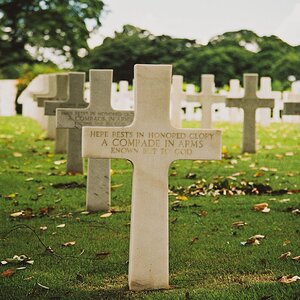
The Lonely Village:
lamsonir5-22.1.jpg

Exif - Tripod mounted Canon 20D w/ Canon EF-S 18-55mm f/3.5-5.6 @ 31mm, 20sec, f/11, ISO 400. Post processed in Photohsop CS2

Nature's Cold Embrace:
westchestercemetaryir8-18.1.jpg

Exif - Tripod mounted Canon 20D w/ Canon EF-S 18-55mm f/3.5-5.6 @ 22mm, 30sec, f/9, ISO 200. Post processed in Photohsop CS2


NOTE - All shots were taken with a Hoya R72 filter
 
are these recoloured? i've not seen digital infrareds before. you got yours converted i assume? i like them much. there a nice contrast to the BW ones.
 
are these recoloured? i've not seen digital infrareds before. you got yours converted i assume? i like them much. there a nice contrast to the BW ones.

They are shot in color by the camera, which look very red when first opened. All it takes is setting a custom white balance in Adobe Raw, a little tweeking in levels, and swapping the red and blue channels and the above results are pretty much what ya get. No color was added back...in fact, most of these are actually desaturated a smidge.
 
I gotta look up how to do these... very neat. Thanks for sharing.
 
Thanks! I love shooting infrared...to bad it's such a pain in the butt with an unconverted camera. Focusing then putting the filter on without changing the focus, dealing with long exposures and noise, blah blah. If I ever have an extra body and the money, I'm definately going to convert it.
 
Is there an R72 in the Cokin lineup? It might make it a tad easier if you just have to drop it in.


EDIT: Just found that the Cokin P007 is available. It is resin and not glass, but supposedly similar to the R72. A bit pricey at $72 from B&H ($45 from Amazon). The advantage might be the slip-in filter vs. the screw-on filter after you're all focused.
 
Last edited:
:thumbup::thumbup: Very impressive. Really love What Lies Beyond. That is my fave of the lot.
I see you had a little bit of wind too. I shot a cemetery in IR last year, and only shot it that way, cause of the wind. It created some really creepy effects.

Well done on these. :thumbup::thumbup:
 
Wonderful shots. The R72 is definitely on my wish list.

Melissa, if you wouldn't mind, could you give a detailed explanation of what you have to do once you get the image on your computer? I know you briefly covered it in an above post, but I would really like to see a detailed explanation.

Thanks!
-Jeff-
 
i love the contrast between the tree and the sky in the first two. The sky is so depressing with the graveyard beneath, but then there is this white tree, a glimmer of hope.
 
:thumbup::thumbup: Very impressive. Really love What Lies Beyond. That is my fave of the lot.
I see you had a little bit of wind too. I shot a cemetery in IR last year, and only shot it that way, cause of the wind. It created some really creepy effects.

Well done on these. :thumbup::thumbup:

Thanks! The wind really does add some definately character to the shot.


bullitt453 said:
Melissa, if you wouldn't mind, could you give a detailed explanation of what you have to do once you get the image on your computer? I know you briefly covered it in an above post, but I would really like to see a detailed explanation.

Thanks!
-Jeff-

Sure, all shots are taken with the camera's white balance set on auto, which creates a very red image. Then, upon opening in Camera Raw I use the custom white balance tool to select a spot that should appear as white. This will create a sort of pinkish effect. Nothing else is done in Camera Raw. Once it opens into Photoshop, the first thing I do is go to Levels and select Options. This will open another box where I select Snap Neutral Colors and then click ok. This will alter your image to look more contrasty. Usually it does the trick perfectly. The next step is going into the Channel Mixer and swapping the blue and red channels. This will turn the picture from pinkish to the ghosty white and blue. That's it...unless the image needs some noise reduction or other such tweeking (curves, sharpening, etc).

As a sidenote, some lenses will create a "hotspot" right in the middle of the picture. I've tried to get some info on this and it seems to have something to do with the coating on the lens and light getting in (I'm not much into the techno part of things...I just like making art). The lens I use (being Canon's kit EF-S 18-55mm) does often create the hotspot...so additional tweeking is needed to get rid of it. Usually it's not that bad to equal it out.

I will gladly post a thread with some screenshots of my workflow as soon as I get a chance!

Hope that helps!
 
Very Nice Pictures...I actually like the first one uncropped though just because it kinda gives of feeling of moving from the dark into the light...
I also like the lonly village..It reminds me of a local one we have here..I may go out and try to do this after seeing yours..lol
 

Most reactions

New Topics

Back
Top