- In Photoshop under Color Settings make sure your working space is set to Monitor RGB. This forces PS to use the same profile your monitor does. Also make sure you have Monitor Color under Settings selected.
- Make sure you're shooting in the same color space you've calibrated for, i.e. sRGB.
- Also in Color Settings under Color Management Policies, make sure "ask when opening"
That's all there is to it.
No and no! This is a very VERY common problem I see mentioned around the internet. Firstly the working profile has nothing, nada, zero, zip, zilsch to do with the monitor profile. This is compounded by the statement that you should shoot in the space you've calibrated for. Well that doesn't make sense since what you shoot in is ultimately to become your working space and you should never calibrate your monitor to another colour space than it's native space. That defeats the purpose of generating a monitor profile to begin with.
Anywho a quick primer:
There are three profiles you need to concern yourself with in colour managed workflow. These are the input profile (embedded in the RAW processor to convert the RAW sensor data into meaningful colours), the working profile (what your file currently is set to) and your output profile (for the screen this is your monitor profile, for the printer the printer profile (duh) ).
The input profile should be of no real concern. If you're shooting JPEG you're never exposed to it. If you're shooting RAW it's that Camera Profile tab that no one ever scrolls down to in Adobe CameraRAW. Leave this one be.
The working profile should always be the profile you're most likely to ultimately publish. You have no reason not to set this to sRGB for the simple reason that this only applies for files that you create new. When you open a file Photoshop will automatically assume the profile of the picture as your current working profile. So if you set the working profile to sRGB then fine your new file you create will have it's values limited to the sRGB colour gamut (very handy out of the box), but if you then open an image from your camera shot in AdobeRGB, well you're automatically in AdobeRGB now, or at the very least photoshop will ask you if you want to work in AdobeRGB, it should never ignore the difference. Click Edit in Photoshop from Lightroom, and the working profile becomes whatever setting you have set in Lightroom to automatically export to Photoshop.
The monitor profile on the other hand is reported by the windows operating system. Colour aware programs (such as photoshop) can poll the WCS (windows colour system) and ask it what profile the monitor has, and will automatically then adjust the output to make sure the colours are as the colour profile (and thus the Spyder3) says they should be. Based on this you should already see that Windows should have the profile generated by the Spyder 3 set for your display.
Let me re-iterate that this has nothing to do with the working profile. Photoshop will open the image and say oooh the image has a pixel value of (255,0,0) and is in the sRGB space. This means I need to convert it to LAB space with the value of (blah blah blah). Ooooh the monitor has a profile that is MonitorRGB. That means I need to convert the value of (blah blah blah) to (230,4,0).
In this example our monitor has a wider gamut than the working space, but while it wrote it in a stupid way it shows that all conversions happen between one colour space and another via a theoretically colour space agnostic intermediary.
So... To set up your computer, and verify the setup.
1. Set up windows so the colour profile for your display device is the colour profile from your Spyder 3.
2. Open up Photoshop. Click edit -> Colour Settings. Under RGB "Working profile" click the down arrow. Now LOOK BUT DO NOT SELECT the Monitor RGB profile. This will show you what photoshop has already loaded. It should say "Monitor RGB - yourcolourprofile.icc" If it says "Monitor RGB - sRGB IEC6....... .icc" then Photoshop has not correctly loaded the colour profile from Windows. This is usually always the fault of Windows. Don't ask me why but it happens. Go back to step one and start debugging.
3. While you're in Colour Settings, set your working space to sRGB. If you work for a professional printing house then maybe you have a reason to set it to something else, but otherwise sRGB will save you headaches. Also check to make sure the options for profile missmatches further down on the window are either set to Use the Embedded profile, or Ask, NEVER ignore.
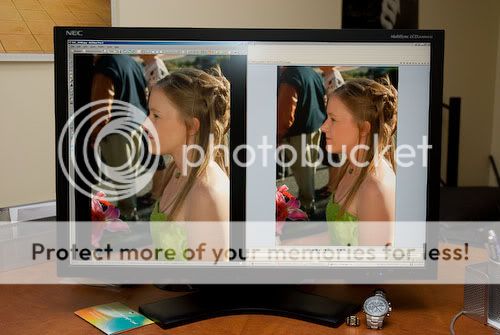
Now we are probably back to square one and Photoshop will be showing colours differently. This is normal. The vast majority of windows applications are simply not colour aware. They will read your sRGB(255,0,0) and display an oversaturated (255,0,0) on your monitor whereas infact you really want a value of (230,4,0). This is very common with wide gamut monitors. To illustrate the effect have a look at this picture below:
On the left: ACDSee Pro2 correctly displaying the Photo identically to Photoshop on my wide gamut monitor. On the right, the preview in my Directory viewer, a non colour profile aware program which has no idea what monitor I have and just assumes everything in its little world is sRGB.
The key here is that ultimately if your Spyder 3 Pro did it's job correctly then Photoshop is the only right application on your computer. Everything else may look different but Photoshop is the one that you should trust. This is also why I browse with Mozilla Firefox. If you type about:config in your browser bar and set gfx.color_management.display_profile to the full path of your icc profile then Mozilla too can be trusted, but it does not read the profile from windows.
Welcome to colour management



 . I want all my software, including internet browser, to show pictures in the same way but i do want my calibration to stay put as well.

 .
. .
.


![[No title]](/data/xfmg/thumbnail/37/37519-6093821531f744039f3ac2b3e30c7dbf.jpg?1734170680)



![[No title]](/data/xfmg/thumbnail/37/37425-6c82b8d207549743954f4b99b56a8153.jpg?1734170466)
![[No title]](/data/xfmg/thumbnail/37/37522-f67b10bc5ee534f9bc21ee94917445b9.jpg?1734170682)