vipgraphx
No longer a newbie, moving up!
- Joined
- Dec 1, 2011
- Messages
- 2,415
- Reaction score
- 440
- Location
- Some Where In the Desert
- Can others edit my Photos
- Photos OK to edit
Guys I wanted to take the time to post a methods of mine while processing HDR. I have been asked by many folks what my method is and I wanted to share with you all that are new to HDR.
This is a tutorial for both very realistic and then a little more grunge/painterly and last using third party filters to make your image POP
The first two are only Photomatix and Photoshop
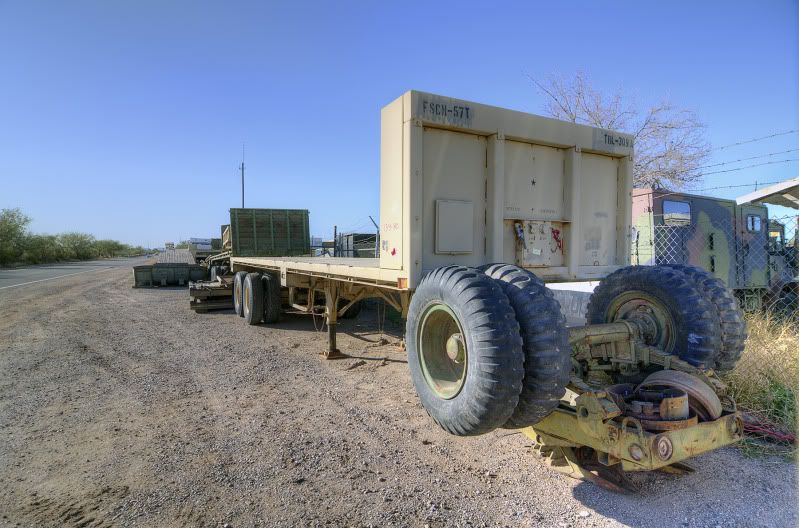
This will be a very long post sorry but hope you will find this informative. The image is not the best image but it should do.
First grab your images and open with photmatix
make sure you select 32bit box. You will use this for later
Once you have gotten to the point where it shows you your first image click save and save it as original hdr

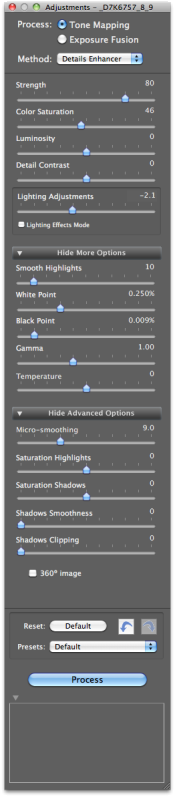
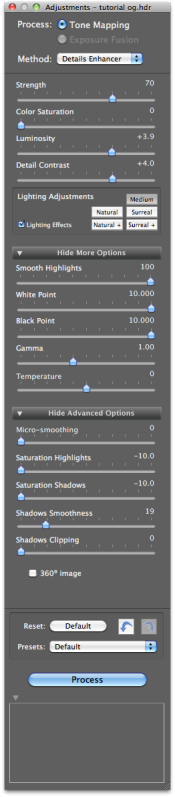
Now select tone map and start using your sliders.
here is mine for this image
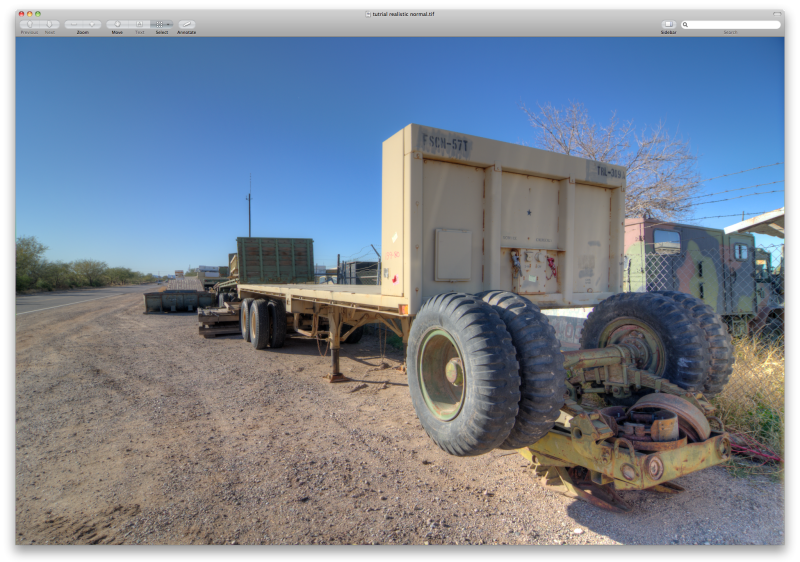
process the image and save as normal
drag the orginal hdr onto photomatix icon
now drag your saturation higher and white slider
process and save as vivid
drag the original hdr onto photomatix icon
drag your saturation all the way down to the left and white and black sliders to the right
process and save as shadow map.
open all three in photoshop
select all the shadow map image and copy and paste over your vivid.
now change your opacity to about 30% deepening on what you want.
select all on your normal image and cop and paste it over the vivid and shadow map.
Now make it a vector mask in your layers window and use your paint bucket and paint it black
Now use your paintbrush using white and paint areas that are to black and lost detail from your shadow map.
Flatten image.
duplicate image and select auto color. Change as you see fit.
Now create a levels layer and adjust as you see fit for your image and flatten.
done Final image
-----------------------------------------------------------------------------------------------------------------------------------------------
Grungier more processing HDR look
Start off with your original 32bit hdr file
Now adjust sliders as you see fit for the more HDR grunge look
here are mine
process and save as normal
drag your original 32bit back into photomatix and adjust the saturation and whites and both highlight and shadows
process and save as vivid

drag your original 32bit back into photomatix and adjust the bring saturation all the way to the left and whites blacks all the way to the right and highlights and shadows to the left
process and save as shadow map
select all the shadow map image and copy and paiste over your vivid.
now change your opacity to about 30% deepening on what you want.
select all on your normal image and cop and paste it over the vivid and shadow map at 30%.
flaten
duplicate layer
auto color 50% is what I went with
create levels layer adjust midtown
flatten
duplicate layer
add vibrance layer and adjust both vibrance and saturation.
merge layer
add selective color layer and adjust colors to your choice.
add some sharpening or unsharp mask
done Final Image

If you have Nik Color effex or Topaz Adjust/ Denoise you can take your image further
I have both but prefer Nik Color Effex
I would not add a detail extractor or bleach bypass or combo of both.
Then I would use topaz denies to remove some noise
Then I would adjust opacity if I felt it was to soft
Next I would add layer and use high pass filter
Set blending mode to linear light and opacity to 30-50%
Flatten and done.

This is just one way I do HDR. I sometimes will process 2-4 photos from photomatix and then blend in photoshop. I sometimes do not create normal,vivid and shadow map because I have filters that can do just about the same thing and takes less time note: (when using filters that does this for me it will give a different effect no so realistic)
When I do HDR I usually have a vision when I shoot the picture but in many cases when I am processing I just flow with my gut feeling and if I am listening to music that tends to change my processing methods..Threre are many ways to process and this is not the Holy Grail of how to but, a simple way to get a realistic HDR image and or more grunge without over cooking your image from photomatix.
Cheers
This is a tutorial for both very realistic and then a little more grunge/painterly and last using third party filters to make your image POP
The first two are only Photomatix and Photoshop
This will be a very long post sorry but hope you will find this informative. The image is not the best image but it should do.
First grab your images and open with photmatix
make sure you select 32bit box. You will use this for later
Once you have gotten to the point where it shows you your first image click save and save it as original hdr
Now select tone map and start using your sliders.
here is mine for this image
process the image and save as normal
drag the orginal hdr onto photomatix icon
now drag your saturation higher and white slider
process and save as vivid
drag the original hdr onto photomatix icon
drag your saturation all the way down to the left and white and black sliders to the right
process and save as shadow map.
open all three in photoshop
select all the shadow map image and copy and paste over your vivid.
now change your opacity to about 30% deepening on what you want.
select all on your normal image and cop and paste it over the vivid and shadow map.
Now make it a vector mask in your layers window and use your paint bucket and paint it black
Now use your paintbrush using white and paint areas that are to black and lost detail from your shadow map.
Flatten image.
duplicate image and select auto color. Change as you see fit.
Now create a levels layer and adjust as you see fit for your image and flatten.
done Final image
-----------------------------------------------------------------------------------------------------------------------------------------------
Grungier more processing HDR look
Start off with your original 32bit hdr file
Now adjust sliders as you see fit for the more HDR grunge look
here are mine
process and save as normal
drag your original 32bit back into photomatix and adjust the saturation and whites and both highlight and shadows
process and save as vivid
drag your original 32bit back into photomatix and adjust the bring saturation all the way to the left and whites blacks all the way to the right and highlights and shadows to the left
process and save as shadow map
select all the shadow map image and copy and paiste over your vivid.
now change your opacity to about 30% deepening on what you want.
select all on your normal image and cop and paste it over the vivid and shadow map at 30%.
flaten
duplicate layer
auto color 50% is what I went with
create levels layer adjust midtown
flatten
duplicate layer
add vibrance layer and adjust both vibrance and saturation.
merge layer
add selective color layer and adjust colors to your choice.
add some sharpening or unsharp mask
done Final Image
If you have Nik Color effex or Topaz Adjust/ Denoise you can take your image further
I have both but prefer Nik Color Effex
I would not add a detail extractor or bleach bypass or combo of both.
Then I would use topaz denies to remove some noise
Then I would adjust opacity if I felt it was to soft
Next I would add layer and use high pass filter
Set blending mode to linear light and opacity to 30-50%
Flatten and done.
This is just one way I do HDR. I sometimes will process 2-4 photos from photomatix and then blend in photoshop. I sometimes do not create normal,vivid and shadow map because I have filters that can do just about the same thing and takes less time note: (when using filters that does this for me it will give a different effect no so realistic)
When I do HDR I usually have a vision when I shoot the picture but in many cases when I am processing I just flow with my gut feeling and if I am listening to music that tends to change my processing methods..Threre are many ways to process and this is not the Holy Grail of how to but, a simple way to get a realistic HDR image and or more grunge without over cooking your image from photomatix.
Cheers


