help me UNDERSTAND speed lights for portraits, please

There is a BIG difference in the pictures you will get in a 16-foot-ceilinged room if you fire a 600 Watt-second Speedotron M11 flash into one ceiling/corner junction, and the pictures you get in the same room, but lighting with a 1/8th as powerful speedlight flash, even if both flash units are aimed in the same corner. That is my experience.

The other day, I went to take pictures of my in-law's new brewery --little did I know, the entire space's ceiling was painting matte black. Two 150w/s monolights at full power, with high ISO and a wider aperture, would still barely provide adequate fill lighting.
 
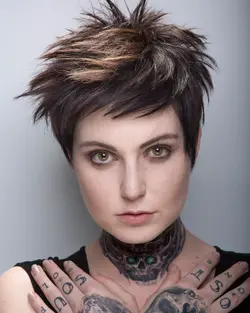
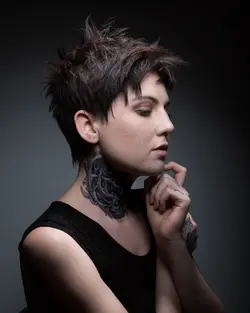
I'm the luckiest guy in the world, I know some photographers who have to beg people to model but through my job I have really nice models lined up for me. Well, they want haircuts, I want patient test subjects. Today I spent 8 hours photographing a few women (one with tons of experience modeling, who helped me pose the others) and all it cost me was some haircuts. I tried soooo many different things that (I think) I've learned. Everything from narrow pools of light spotlighting the subject from barely outside of the frame, as close as possible to the subject, who was as far as possible from the wall, to a soft box across the room with the model backed up against a white wall. I tried some back lighting and even fiddled with some gels. I basically just employed good old fashioned trial and error, seeing a dark area then trying reflector, speedboat light, then mono light to see what I could get to work. I've got more models lined up the next three days, but I'll try not to bug you guys with the photos unless I have a specific question.
3G7A1040.jpg
3G7A1050.jpg
3G7A0887-2.jpg
3G7A0970-2.jpg
 

Attachments

  • 3G7A1011.jpg
    3G7A1011.jpg
    499.5 KB · Views: 131
You did very well with today's photos.i can see the improvement you have made over just the last fortnight.
 
.. I'll try not to bug you guys with the photos unless I have a specific question.
Bug away! Please!

See how the orange backlight draws the viewer's eye to the hair? It's ON FIRE! You can continue to experiment with gelled spots by aiming your snooted and gelled light from the front onto the model's flame-mane haircut. Sometimes adding an off-beat color is all you need to make your photograph special.
 
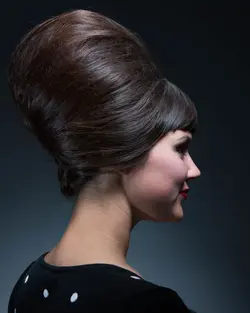
I had a chance to shoot another really great model today. My wife styled the model's hair for an upcoming hair competition she's entering, and I was excited to get to shoot some photos for it. Three years ago I hired a photographer to shoot some looks for me so I could enter a similar competition (the entries usually hardly show hair but look more like part of a creative photography competition), and that's what made me go get my first DSLR. I figured if I had a camera I could enter all the competitions and eventually win something, but I've never felt confident enough in my photos to organize a shoot and go through with entering. Since the start of this thread, though, my confidence is up a lot, even though I know I still have a very long way to go. I think I'm going to enter the next one that comes up, it'll be fun to organize and execute even if I don't place.
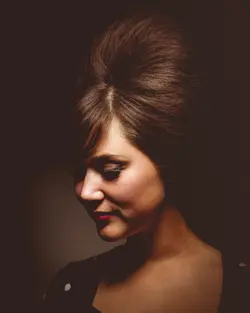
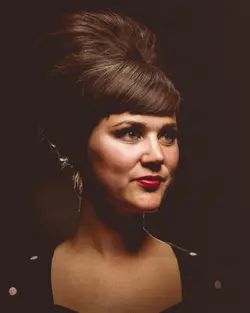
These aren't the images she's using for the competition, these were extras I pulled from the set and tried to edit to look filmy, since the hairstyle looked kinda retro. The good photos showed a lot more hair and basically only had the skin touched up. I also burned a roll of Kodak Tri X on this session, so in about a week I'll get to see what my tiny two weeks of lighting experience looks like on film.
3G7A1229.jpg
3G7A1204.jpg
 
I think I'm going to buy a black backdrop. I keep trying to get a dark background from my white wall and I think I'm losing too much information on my subject because of that. I've read that a gray backdrop can be made to look black or white pretty easily, but since I have a white wall already I figure I have the white abilities of a gray backdrop covered, and that a black backdrop will probably be better at being black than a gray backdrop would. Am I correct in my hopes about such a tool? Could I move these lights back to get less contrast on her and still have a black backdrop look dark enough for what I might have been going for here?
3G7A1292.jpg
 
In a 10x10 shooting area, it would be extremely useful to have a gray and a black backdrop. Due to the inverse square law, it would be most helpful to have some darker backdrop options in such a confined space; the lighting options you have will be greatest when the backdrop is fairly close in original tone to the tone you want to end up with.
Right now you can create white-to-gray, but it's different when the starting point is darker gray, or black. Gray to black with gradation is lovely.
Right now you are working with subtracting (preventing) light hitting white in order to make it a darker tone: the distances you have are limiting you.
The opposite is starting with a black wall, and adding light to the wall to make it lighter. Not keeping light OFF the wall, but ADDING light to the backdrop.
A gray backdrop is very different than either white OR gray! Due to the short distances you have, you are unable to Key-shift the backdrop tones without affecting the subject lighting. if you had 20 feet behind the subject your options for Key-shifting the white to darker tones would be unlimited.
Again-- think about whether you want to add or prevent light on the background, and what tone would be easiest to start with: white, dark gray,or totally black.
 
Last edited:
Could I move these lights back to get less contrast on her and still have a black backdrop look dark enough for what I might have been going for here?
No.

To make your background go dark, (black) you need to keep light off it, and set your shutter speed fast enough to complete the effect. Since your camera's sync speed is (probably) 1/250 of a second, you're limited in how fast you can set the shutter speed.

Two ways that I am aware of to keep light off the background is to move it way back (20 feet?) behind your model (which is impractical in the space you have available) or "flag" the lights. A flag is a piece of opaque material blocking the light from going where you don't want light. Some studios use "barn doors" which is four flags on hinges that can be pivoted this way and that to tailor the light. You can also use just one piece of material held with a clamp to block the light from going to the backdrop. You can probably make something using found materials, such as cardboard or foamcore.

So the answer to your question is no. You have to "shape" the light with something to prevent it from going beyond your model to the backdrop. Also, be mindful of room light and light "scatter" coming from your strobes or any other light source in the room. Ideally, the room will be nearly dark (except for modeling lights) and when you fire the flash(es) no light will light the backdrop. Then it will be black in the photo.

BTW: those other photo entries; do they have the hair beautifully lighted? The shot of your wife's model needs a hair light.

Less on her face, more on her hair. A second spot of light on the opposite side of your key light will define the top/back of the hairstyle.

(edit) here is one DIY speedlight snoot that unfortunately will set you back about $0.50 for a sheet of paper, and about two minutes of your time.

DIY - Homemade Speedlite "Snoot" - DIY Photography

Disregard how it is used in the example photograph, because that is for a portrait, not a hair shot. Visualize the snoot aimed at just the hair, not the face.
 
Last edited:
QUESTIONS:
andrewdoeshair said:
I think I'm going to buy a black backdrop. I keep trying to get a dark background from my white wall and I think I'm losing too much information on my subject because of that. I've read that a gray backdrop can be made to look black or white pretty easily, but since I have a white wall already I figure I have the white abilities of a gray backdrop covered, and that a black backdrop will probably be better at being black than a gray backdrop would. Am I correct in my hopes about such a tool? Could I move these lights back to get less contrast on her and still have a black backdrop look dark enough for what I might have been going for here?
View attachment 137045

Okay, there are two questions in there. First answer: If you had swapped in a solid black velvet fabric for the white wall in this shot, it would have been pitch-black in the upper left corner, and would have had a very slight lightening to a dark,dark gray where the most light hit the fabric. If you had swapped the white wall for a thunder gray background, it would have been very dark,with sublte tone gradation, yet lighter than the black background.

The second question is trickier to answer. You asked, "Could I move these lights back to get less contrast on her and still have a black backdrop look dark enough for what I might have been going for here?"

First off, you write these lights? Let's assume there is just one, main light that lights her. The answer you're looking for is a bit conterintuitive. Moving the main light back, farther from her, would lessen its intensity on her, so you'd have to open up the aperture to get the right exposure on her face, and in doing so, you would ALSO be exposing the background more. If the light were to be placed farther from her and the background, the degree and the rate of light fall-off behind her would be slower, and thus, opening up the f/stop to get her face exposed properly would actually INCREASE the exposure for the background at the same time! Again, the Inverse Square Law means you'd want to bring the lights CLOSER to her, so the rate of fall-off in intensity would be more-rapid, and you would also need to close the f/stop down, say from f/8 to f/13, and that would create a darker background!

Let's be clear: the 10 x 10 foot distance is simply too short a distance to work freely, and to be able to easily and casually make white into black through fall-off based on pure distance to the backdrop. You're kind of trapped in the intermediate distances where there will almost always be "some" light hitting the background, and where even small differences in the key light modifier's type, and its distance, can make a big impact. First off: GRIDS. Grids will increase the rate of fall-off very hugely, so you need to specify what "these lights" actually are, like 31x 31-inch gridded softbox, or 22-inch gridded beauty dish, etc.. Using a gridded key light will keep the light from hitting the backdrop, and will tremendously restrict the distance the light will be visible behind the subject. A gridded softbox or gridded beauty dish as the key light will make a white wall drop-off to gray or black much more rapidly than say, a reflecting umbrella would; the umbrella would tend to light the subject AND also light the background with a "normal rate"of loss of intensity over distance.

Secondly: In post #51, the look you were going for can be arrived at by not allowing much light to hit a white wall, OR by allowing a tiny bit of light to strike jet black, OR by allowing an intermediate amount of light to strike a gray backdrop. In a SMALL studio, it's often easier to work with a dark backdrop and add a background light, or to let some of the un-gridded main or key light's beam to hit the subject and the back wall, using a single light to light both the subject and the background.

I'm not trying to diss your 10x10 foot space, but you're in a VERY tricky position where the subject simply must be fairly close to the back wall, and where the Inverse Square Law is transitioning from RAPID rate of light fall-off behind the subject to only a moderate rate of fall-off behind the subject distance. Moving the light unit CLOSER to the subject makes the light softer, and yet, increases the amount of darkness behind the subject. At close light-to-subject distance, scooting the light just six inches closer can mean an entire f/stop smaller on the lens will be needed to get the right skin exposure, say from f/11 to f/16. Moving the light close to the face, and shifting from f/11 to f/16 will darken the background quite a bit when you are in a 10x10 foot room, with the light 4 feet from the face and six feet to the back wall.

So, what I'm laboriously trying to write out is that 1)in a SMALL shooting and lighting and posing area, it's very challenging to do the full, total gamut of key-shifting by using only a white wall or paper; black paper or fabric,or gray, either tone, will be much easier to darken than white paper. And 2)there is the element of lighting the backdrop by either A)Adding light to it or B)keeping light from hitting it and 3) The Inverse Square Law actually works "backwards" from what most people would assume, as it relates to how bright the background will be based on moving the light father away because 4) the exposure given to the sensor is based on how much light the face gets hit by, and not how much light hits the background wall.

This is tricky to write about. Mark Wallace at Adorama TV has a nice video that might make the Inverse Square Law and the CHANGE in the rate of light's fall-off over distance make more sense to those who have difficulty understanding why the 10x10 foot shooting area makes key-shifting through fall-off such a tricky predicament. You are working in a VERY challenging distance range to be able to wrangle light at the level you want to be at. You're right on the cut-off of where fall-off moves from a rapid rate, to the moderate rate; you would need 18-20-25 feet to get into the zone where there is no measurable fall-off in intensity over a four-foot run of distance, which is around the distance I think you have behind your haircut subjects and the back wall,meaning the lights themselves are no more than 6 feet from the haircuts. This is a very demanding distance for light-to-subject, and even small changes in distances have a BIG impact on final exposures, and on background tones.

Again, you're in the distance zone where the Inverse Square Law makes foreground and background light level differences VERY significant, and where the rate, and the absolute degree, of light's fall-off in intensity is very high. This is why white, gray, and black backgrounds could be so,so handy to have,depending on what background effect you want to have in the final image.
 
Last edited:
Moving the main light back, farther from her, ..
I misunderstood his "back" question. I took it to mean; move the light more toward the backdrop, i.e.; away from the camera position, but actually closer to the model. If that is what Andrew meant, then o.k., but if not, then I apologize.
 
Moving the main light back, farther from her, ..
I misunderstood his "back" question. I took it to mean; move the light more toward the backdrop, i.e.; away from the camera position, but actually closer to the model. If that is what Andrew meant, then o.k., but if not, then I apologize.

Yeah, I took very careful pains to write, and to proof-read and to then revise (three times!), my replies because the writing about lighting can be very tricky. This is one of those situations where a common word might mean one of two, different things!

Heck, I did not consider the possibility that by "back" that he meant back toward the subect, and closer to her. In fact, my response was framed with the idea that he meant moving the main light farther from the subject, and closer to the camera. The Inverse Square Law is so counter-intuitive to most people that I feel it's best when discussing how to use it that I laboriously write out even simple steps like,"Moving the main light back, farther from her," to help clarify the actual camera-room step under discussion.
 
Last edited:
Thanks again for the continued advice! I will paper snoot my speed light! I have a snoot for my strobe on its way. I find myself reaching for a speedlight and a small stand when I can't see enough shape around the dark edge of the model but then I end up ditching it after a few shots because the light looks too shiny compared to the light from my socked or gridded beauty dish. Are those (seemingly silly because they're $4 on Amazon) tiny Velcro-banded micro softbox diffusers of any use to soften that light, or is it more an issue with the size of the light? In the case below, for the highlight along the back contour of her hair I didn't have enough room under her hair to get an umbrella of any kind on the speed light so I just used the little pull out plastic flap, which basically doesn't do anything.
3G7A1149.jpg

As I was writing this response the second response from Derrel came in. I totally get that moving the light closer to her would darken the background (thanks to your previous replies and to the video you just mentioned) but what I meant was that I was losing light at the back of her head and wanted more of her head to be in the same plane or field or whatever, to keep the light from dropping off so hard at the back of her. I'm assuming I can't get THAT and also a dark studio feel at the same time in my little room, as it is now, but was hoping a darker wall would lend to get me a little closer. I'm ordering one of those paper roll racks with the dangling chains today and also black, gray, and white paper. It makes sense that a white wall becomes harder to vary in such a small working area, I guess I'll have to see what black and gray can do. Also, after I posted those first pics last night I had a "duh" moment and remembered that I could edit out some of the lightened background. I've been so bent on getting everything right in the camera since I started shooting film, I forgot about how heavily I relied on light room and photo shop in the past. I don't plan on being a photo shop junkie, not that I'm opposed to that, but until I can get it right on camera I guess it'll do.
3G7A1204-2.jpg

Changing gears for a moment from what's in my studio to what's in my head, can I ask you guys about certain "mental blocks" I keep running into? A recurring theme I've heard in this thread and in other places is that I'm not showing enough hair for a "hair picture" and I totally agree but I keep hitting some internal struggles as I throw more light on the hair. I first try to justify my approach by imagining that I'm selling the sizzle and not the steak ("look at her eyes! Don't you want to dive off of her cheeks and swim in them?! Oh yeah, and she also has cool hair... By the way, I do hair. Want me to do yours?") When I see a picture that is ALL about the hair I feel like it's coming on too strong, I want to have you notice the hair after you notice the eyes or cheeks or long neck and sexy shoulders. I suppose I should force myself to make the hair priority number one, not just because it's probably a requirement in where I'm eventually wanting to be, but because it'll help me get out of my little box. Should I listen to that inner voice that wants to make the hair whisper or shut it up and learn to be comfortable making the hair scream? I'm sure the answer is that I should know how to do both and then keep both approaches around for the right situations. But then I run into mental road block number two.

By the time I have everything adequately lit to where it's like "yep, that's hair, on a head" I feel like I'm looking at something fake. I decided a few weeks ago after looking through a bunch of photos in books that I don't like three point lighting. Not because it's apparently a standard method, but because it never happens in real life. I don't believe it. When ever do you feel your heart skip a beat as you spot a strange and appealing woman across a room where she has an open window (at golden hour) 45 degrees from her face, a large reflective surface 45 degrees from the other side of her face, and a narrow spotlight hitting the top of her head? If that happens and you gasp it's probably because you're in awe that she accidentally found the exact spot in that room that resembled a man-made lighting scenario! The images that I see and love and want to be able to create clearly use studio lighting, but in a way that they don't look like TOO much of a made up story. I imagine that it is possible to have everything well lit but also without looking like an overly curated and staged scene, but I think (and correct me if I'm wrong) that's kind of the ultimate goal of studio photography. Like if I was in a guitar forum saying "yeah, I just started recording my first album, does anyone know how I can really connect with listeners in a meaningful way and maybe sell a million copies?" Should I keep aiming for what feels somewhat believable to my inexperienced eyes, or break out of that mindset and explore the spleandorous world of lighting that never happens in real life? Again I'm sure the answer is try both.

Mental block three is reds and pinks in skin. How much do you guys get hung up on that in editing? Everyone usually looks too red or pink to me, so I mess with the reds and pinks so much that I forget what a human looks like and even after resetting it all back to zero I don't feel like I'm looking at anything real. If it bugs me enough I give up and go B&W (that's why half my shots aren't finished in color). Is it all in my own brain, something anyone else wouldn't worry about? Is a red nose or cheeks something to be corrected or a useful part of the story? 90% of the time I'm not happy with my "corrections" so I either leave it as is and think "if the camera saw it that way, it must be accurate for them" or I take out all the colors. I don't know if that's more an inquiry about proper/not proper, or if I'm just trying to figure out if I'm weird for spending half of my time editing worrying about pink skin.

Last thing. Off of mental blocks, back to technical inquiries. This could be googled, but since I have you reading already... If I wanted to throw light on my wall or back drop, what's the best way to do that? Option one I guess is to move my lights fursther from her and move her closer to the wall, but then I have shadows on the wall (which may or may not be a good thing, probably a case by case thing depending on whether I want her to look like she's in real life or like she's in limbo). Is that a big softbox job (how do I hide that thing if it is?) or a two speed lights job?

Very sorry for the LENGTHY and needy post. I meant to write a quick thank you but then all this came out. I really, sincerely appreciate the time any of you have put into even reading this.
 
This is Beyond The Basics, so your post and the replies are legitimately lengthy and verbose at times. No prob! In order a few replies. You are right to try to get most the lighting basics and fundamentals as correct in-camera as you can. If the back or far side of the hair needs a light, use a light or reflector to get some light there, but keep in mind that in Lightroom, you can Dodge highlights a bit to make them brighter, a wee bit more emphatic. And I do think the speedlight's little "flap" does actually do something. So can a business card, or plastic spoon, a 3x5 inch index card, or a StoFen diffuser, or the 14mm wide-angle lens, and YES, the tiny softboxes and the Rogue Flashbender, etc. all can subtly change a speedlight's size and specularity of light/quality of light.

Light rays cannot bend around a big beehive of hair; unless the modifier's rays can "see" the subject, the light is blocked by the hair or body, so...grip arms and 12" x 12" foam core reflectors held by clamps are in your future, maybe. Or other reflectors can be used, or second lights.

There's a fine line between showing the hair mostly, or creating a striking fashion-y type portrait of the subject. In these, she's a gorgeous woman with a retro-inspired yet modern, hip hair style. She looks fantastic. Great cheeks,chin,lips,eyes, face, hair, clothes. Your warm-toned, "filmy" looks are fabulous. Are you selling hair snipping and styling, or are you trying to create a glamorous, idealized look? I think the latter, in order to create that, "Damn-- I wanna' look like HER!" feeling in potential customers for your services. Hair style look books that are sterile but which show the hair stylist/barber's work are one thing: I think these are more of advertising images, images to create a desire in the part of the customer to, "look like that!"

RE: studio lighting and 3-point or Key-Fill-Background Lighting. It has been around a long time, and people know the look. Yes, it has a degree of artifice, yet it shows shape and dimension. Using just one, single key light and no fill lighting unit, but subtle reflector fill, can reduce the degree of artifice. Adding accent lights, hair lights, etc.. makes a shot look more artificial, yet some people like that "glamorous lighting". Consider too, turning the subject's face or averting their eyes: that shifts focus onto the hair, as you did above in the photos #50-1 and #57-1. Shot #57-2 is a nice portrait of a pretty woman with a great hairstyle. All three, together, show the hair styling and the person, in a complete way.

Small lights, at a steep angle coming toward the hair from behind, become "hotter", or more shiny; more specular, to use the proper word. Odd behavior, but angles of 8,9,10,3,4 make the hair light look normal: steeper angle of incoming incidence like 11,12,1,2,3 o'clock make the hairlight "hotter". "Glancing light does not look right." Adding diffusing material, like milk jug or window screening, or grid + diffuser makes the hair lights look less specular, and more "organic", and adds that lovely sheen, that broader, more-soft, great hair look. Hair lights that are larger, rather than smaller, cast a broader, more gentle, more-diffused sheen on the hair. Strip boxes are common for this; speedlights need to be made bigger than the front panel, or they cast a slightly-too-crisp light than calls attention to itself by being different than the rest of the light.

RE: color, color toning, B&W. I no longer care about color accuracy: that is dead,dead,dead, along with leisure suits and 500 cubic inch V-8 engines and white loafers. We're in the Instagram era now, and these are images for modern-age people. Forget about slavish adherence to color fidelity. I am sick of perfect, neutral,accurate color. Color fidelity is a 1970's ideal that has lived out its usefulness in some fields. I do not want to see 1970's color in 2017 hairstyle imagery, unless it is showing hair coloring services.

RE: how to apply light to a backdrop. On paper, be aware that a straight-in angle to the wall gives the least reflection, and shows the least amount of wrinkles, dips,warps, and texture once the paper gets old. How far the light is from the wall, and at what beam angle, determines how it hits, and how far it spreads over the paper. A 7-inch reflector on a monolight, from 1 foot to 6 feet from the background, and aimed anyway you like, is common. Use a grid, or no grid, or barn doors, and light the backdrop for 'effect desired'. You can light a backdrop a million ways; did you see the Strobist way of blasting light through drinking glasses lined up and filled with water or colored liquids? You can fire a light high and downward in a slanted way across the backdrop, or light it with a gradient from bright to dark,etc.. No one way. Modifiers? Umbrella, softbox,strip box, speedlight, 7-inch reflector, bare-tube flash, whatever, just depends. It's hard to hide a softbox behind a person, but smaller lights are easy to carefully obscure.
 
Last edited:
1. .. I end up ditching it after a few shots because the light looks too shiny compared to the light from my socked or gridded beauty dish.

2. .. I was losing light at the back of her head and wanted more of her head to be in the same plane or field or whatever, to keep the light from dropping off so hard at the back of her. I'm assuming I can't get THAT and also a dark studio feel at the same time in my little room, ..

3. A recurring theme I've heard in this thread and in other places is that I'm not showing enough hair for a "hair picture"

4. The images that I see and love and want to be able to create clearly use studio lighting, but in a way that they don't look like TOO much of a made up story.

5. Mental block three is reds and pinks in skin.

6. If I wanted to throw light on my wall or back drop, what's the best way to do that? Option one I guess is to move my lights fursther from her and move her closer to the wall, but then I have shadows on the wall (which may or may not be a good thing, probably a case by case thing depending on whether I want her to look like she's in real life or like she's in limbo). Is that a big softbox job (how do I hide that thing if it is?) or a two speed lights job?
1. You can soften light from any light by using some kind of diffuser. If the diffuser is large relative to the subject, the the light will "wrap" more, making the light appear softer. Those small speedlight diffusers that are only about 12 inches wide are not really wide enough to soften much light. They're better than nothing, though, so use whatever you can.

2. Yes, you can. Use a "flag". Anything that is opaque and large enough to block light from your backdrop.

3. The style that you choose to create is entirely up to you. I assumed that you wanted to showcase the hair because you had mentioned it. If you would rather make it a portrait, then that is your call, but you still need a hair light to separate your model's hair from blending into the background.

4. A "balanced" lighting scheme is good for an employee identification photo or a high-school graduation photo, or a child's birthday photo, but you can do wonders with an "unbalanced" lighting scheme, even using only one light. The choice is yours.

5. First of all, make sure you have done everything correctly as far as setting your white balance, shooting something in the shot without color (a gray card, or a white styrofoam plate, or similar), get your computer display calibrated, and keep the lighting in your computer room (office) consistent for each editing project. Then, if you still see red or magenta, add a little bit of cyan to the image to counteract the reds. Doesn't take much to make a difference.

6. Use a separate light (or two) positioned behind your model, and aimed at the backdrop. Don't allow these lights to contribute to the light on the model.
 
^^ Wonderfully condensed writing! And as to the advice, "Then, if you still see red or magenta, add a little bit of cyan to the image to counteract the reds. Doesn't take much to make a difference."

This mirrors exactly what a friend told me! He spent 17 years working in color-toning and image prep for The Oregonian newspaper. He told me one of the secrets in skin-tone color-toning was just exactly that! "Add a little bit of cyan, and most people will like it better!" he said.
 

Most reactions

New Topics

Back
Top