fjrabon
Been spending a lot of time on here!
- Joined
- Nov 3, 2011
- Messages
- 3,644
- Reaction score
- 754
- Location
- Atlanta, GA, USA
- Can others edit my Photos
- Photos OK to edit
There's been a lot of talk around here lately about what modes you shoot in, especially as it applies to manual shooting. I think some of the comments betray a misunderstanding of how the modes work, when the modes are most useful, and how to best take advantage of these modes. Here, I'll mostly be talking about how I transitioned to shooting in manual, when I use it, and how I shoot in manual. From what I've seen on TPF, there's a lot of talk about shooting in manual, but I can't recall seeing anybody go about their process for doing it. Perhaps this might be useful to somebody who is intrigued by shooting in manual, but just hasn't made the leap yet. Other modes will also be discussed, especially when I'd use them, but this is mostly a discussion on how I shoot manual.
Manual can be very daunting for the person who just got their first dSLR. P,A (Av for Canon) and S (Tv for Canon) all just spit out relatively well exposed photos that look pretty, to say nothing of the scene modes that most consumer grade cameras include as well. The first time anybody sort of ventures into that 'M' water, they usually drown in a sea of wildly inaccurate exposures. Those other modes make such pretty pictures, and you can just focus on composition. Why even venture into these scary manual seas, I'm not a pro anyway? That's how I think most people feel.
I know I felt this way for a long time. Well, by long time I guess I mean maybe 5 months after I got my first dSLR (actually nearly a year ago to the day, I got my D3100). I probably used green auto for a day or two, just to see what the thing could do. Then I found this website, and started using aperture priority (A mode) for nearly all my shooting. Aperture priority is quite an amazing thing, especially in modern Nikon cameras with matrix metering. For how much some of the 'pros' on here boo hoo it, these cameras are pretty freaking intelligent. The vast, vast majority of the time, it'll get you a good exposure. It also allows you to control your depth of field easily too, so you can get those creamy, bokeh filled backgrounds, which are the hallmark of somebody trying to get more 'professional looking' results, but not quite being there yet. And A mode, in my mind, will always have its place in my arsenal. Heck, Joe McNally uses A mode a LOT of the time, and if it's good enough for Joe, it's good enough for just about anybody.
After I started testing out the waters of A mode, I slowly started venturing into the world of exposure compensation. Essentially exposure compensation simply takes the exposure value that the camera thinks is right, and adds some brightness or darkness (via slower or faster shutter speed when you're in A mode), as you tell it. So, let's say I'm in A mode, and I take a shot, and I think "hey, that's a bit brighter than I think it should be." Well, just dial in a little bit of negative exposure compensation and bam, you're controlling things a bit more.
However, I sort of began to notice a few things about my A mode shooting. First, using A mode with exposure compensation can be sort of annoying in certain conditions. SO lets say I'm taking a photo of a group of friends. Let's say that I dialed the perfect settings in for them using exposure compensation. Snap it, great. Next, another friend, wearing all white jumps into the photo. It's fairly bright daylight and the guy is wearing all white. This is going to confuse the camera's brain (because, after all, who would wear all white?), and it's going to cause the camera to throw your exposure off, as it tries to tone down that bright white. It might fight through and recognize faces (these things are smart) and hang on to the proper exposure for the faces, but it might not. And this is just one example, there are all sorts of scenarios where the camera gets fooled into changing your exposures, when you didn't want them changed. It's somewhat possible to work around this, but it's kind of a pain, and unreliable anyway. A second thing I noticed about A mode was that it was shaping how I viewed exposure. Because I had gotten so used to shooting in it, I sorta began to subconsciously think things should look that way. What I mean is that shooting in A mode made me start thinking like the camera. And I was producing a lot of good, but not great shots. Everything looked quite okay, but nothing stood out. Because in order to stand out, you can't do what everybody else is doing. And that's what A mode does. It makes your exposures look like what everybody else's exposures look like. Also, about this point in time I started working in a studio, where your lights aren't TTL, and thus you are FORCED to go manual.
It's very easy to get comfortable with A mode. It's especially easy, because when you first start with manual, your shots will usually look worse than they did when you were shooting in A mode. You feel like you're taking a step backwards, not making some great leap forwards. And often times you'll sorta just say "well, I was getting better shots in A, let's just go back to that for the moment, and learn M another day."
Luckily for me, I was more or less forced into shooting M mode. I had to learn it. Granted, shooting manual in a studio with big lights is a different thing than shooting a fluid event in manual. In a studio you're usually going to light meter. But simply being forced into it at all really took a lot of the fear of it away.
A related side-point here about camera bodies. If you have one of the beginner cameras that just have one control wheel, really you probably should just stick to A mode. Those cameras aren't really made to shoot manual. Manual is a PITA if you have to hold down a little button to adjust shutter speed. Really in those cases you might as well just use exposure compensation when you need to. In order to effectively shoot manual, you need a dedicate wheel for both aperture and shutter speed. As Zack Arias has said, he could absolutely do an editorial shoot with his son's T2i image quality wise, but he'd end up smashing it against the wall because of the single control wheel. If you shoot manual, you should have a body with dual control wheels. So, my job forcing manual on me, and getting my D7000 with dual command wheels were really the two things that paved the way for me to shoot manually effectively. And I don't mean any of this to belittle models like the D3100, D5100T1i or T2i. They're fantastic cameras, really. I took what are still some of my favorite photographs with my humble little D3100. And really, there's nothing wrong with shooting in A mode, you occasionally have to work a bit harder, and you have to make a conscious effort to not let the camera dictate how you shoot, but it can be done. Especially if you're not shooting professionally and crunched for time, and thus can fiddle with things a bit more.
Now, when I first started shooting in manual, I didn't actually think through the part I mentioned earlier about not letting the camera dictate how you shoot. Because at first, when shooting on my own outside the studio, what I was doing was constantly just centering the in-camera light meter on matrix or center weighted metering. A huge number of photographers shoot this way, that is in manual, but always centering the in camera light meter. These photographers are also the ones who tend to belittle people who don't shoot in manual the most. They are prone to statements like 'I'm not a hobbyist, I shoot in manual' or "if you want to be a serious photographer, shoot in manual'. What they fail to understand is that when you always center the in camera light meter, you're shooting in A mode, you're just turning the dial for the camera, instead of letting it do the work. If the difference between hobbyist and serious photographer is simply turning a knob, well, then that's no difference at all.
So, if you can't just use your in camera light meter, then how the heck are you supposed to shoot in manual? Do you have to have such good eyes that you can look at a scene and just know it needs ISO 200, f/8, SS 80? THough some photographers can do that, that's not necessary at all. What is necessary is knowing what your in camera light meter does, and how to use it. First, I'm of the opinion that if you're going to shoot in manual, you need to shoot with your in camera light meter set to spot mode. In spot mode your camera is essentially going to tell you how close whatever it is the little dot is pointing at is to middle grey. Middle grey is exactly what it sounds like, the exact middle value in the camera's grey scale. When a scene comes out to about an average of middle grey, it tends to be considered 'properly exposed' Things are a bit more complicated than that, but that's all we need to know for now. The second thing you need to know is what you want your exposure to look like. Of all the things that go into shooting manual, this is the only one that's actually difficult. Because it's an artistic decision. If you just want a standard looking exposure, just shoot in A mode, or even P mode. There is nothing wrong with that when a shot calls for a standard exposure. You might have to give a touch of exposure compensation here and there. But manual is what you need when you don't want a perfectly standard exposure. When you want to create something with light. Because while these modern dSLRs are great at many things, they aren't yet creative. They can't look at a scene and decide that you want a single highlight of the person's face, with quick fall off and dramatic shadows everywhere else. It can't see that you want a dark and ominous sky and silhouettes. It has no idea that you want to shoot an edgy high key portrait with one single spot of dark that is a pool player holding an 8 ball. The in camera light meters have gotten more intelligent, especially in matrix mode, but at the end of the day, they are all about producing normal looking shots.
So, back on point, you gotta know what you want your picture to look like. Then, with practice, it helps if you roughly know what that would correspond to in the light meter. ie, you don't need to be able to see the exact values that it would take to achieve it, but you do need to know what you want in your frame to be middle gray. Then use your in camera spot meter. Sometimes you may not want anything to be middle grey, and then you need to know what rough values you want them to be on the in camera light meter.
Essentially, you have to think of the light meter as a tool that tells you how close whatever it is pointed at is to middle grey. And then you have to be able to get your exposure to where you want those various parts in relation to middle grey, based on your artistic vision. Fiddling with the buttons to get yourself there is the easy part, though that's perhaps what seems daunting to people starting off. Knowing where you want the exposure is the hard part, the part that makes you a photographer instead of just a snapshooter.
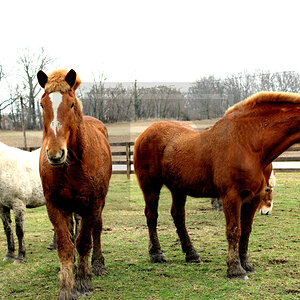
basically to give you guys an idea of what I'm talking about here, I'll post a shot I just took a few minutes ago, expressly for this purpose:

DSC_4068 (1) by franklinrabon, on Flickr
edit: D7000; 35mm f/1.8g; raw; converted to B&W in aperture (crop and conversion were only edits); f/1.8; ISO 160; 1/30 shutter
Here, there were basically three zones of light: 1) the background, which was ambiently lit; 2) the left side of my dog's face, which was lit by light reflected off my front porch floor, then through a window (porch is covered, and it's overcast, so this is essentially sunlight, thrice diffused, by clouds, by a white porch floor and by a dirty window) and the right side of my dog's face, which is lit by a Metz AF-50 speedlight, through a 24" hotshoe speed box.
Essentially my thoughts were this: First I wanted to shoot at f/1.8 for the DoF. I wanted the tip of her nose OOF, because I really wanted to push the viewer to her eyes. She has some white whiskers on her chin, and had they been in focus, the viewer would be a bit more drawn to them, being the lightest thing in the picture. Shooting a black dog is tough, because naturally the eye is drawn to light things, so you have to work a bit harder to get the viewers eyes where you want them. Next, I wanted to get the background to middle grey (the back wall is actually a dark red), I wanted just enough of the speed light to hit the wall to give it fall off towards the edges, almost a subtle vignette, but created with flash. I wanted a few highlights on the right side of her face, and I wanted the soft diffuse ambient to light her left side. I didn't want the light to be so even and flat to be boring. I wanted the contrast of varying levels of contrast. So, how do I go about this? first, I pointed the in camera light meter at the edge of the background and centered that for middle grey, then I checked the left side of her face to see if that would still get her at an acceptable level. To make the background pure middle grey, my dog would be a touch darker than I wanted, so I slowed my shutter speed just a tad bit. I guessed that this would mean I needed the flash at about 1/64. That was pretty much right, and I just left it there. The sppedlight softbox is at about a 45 degree angle, elevated about 2 feet above her head and about 2 feet back.
Essentially I started with my DoF. Set that where I wanted. Then I started figuring what shutter speed to get the ambient levels where I wanted them using the in camera light meter (remember, shutter speed doesn't do anything to flash). Then I figured out what level I wanted on my flash, by looking at the levels my correct ambient exposure gave me on the side that was going to be flashed. Then hit the shutter.
I'm not saying any of this is better or worse than anything else, that's just how I do it. And since I rarely see anything like that written around here, just thought I'd share with some new shooters, or even intermediate shooters my approach. Feel free to take whatever you'd like and discard whatever you'd like.
Manual can be very daunting for the person who just got their first dSLR. P,A (Av for Canon) and S (Tv for Canon) all just spit out relatively well exposed photos that look pretty, to say nothing of the scene modes that most consumer grade cameras include as well. The first time anybody sort of ventures into that 'M' water, they usually drown in a sea of wildly inaccurate exposures. Those other modes make such pretty pictures, and you can just focus on composition. Why even venture into these scary manual seas, I'm not a pro anyway? That's how I think most people feel.
I know I felt this way for a long time. Well, by long time I guess I mean maybe 5 months after I got my first dSLR (actually nearly a year ago to the day, I got my D3100). I probably used green auto for a day or two, just to see what the thing could do. Then I found this website, and started using aperture priority (A mode) for nearly all my shooting. Aperture priority is quite an amazing thing, especially in modern Nikon cameras with matrix metering. For how much some of the 'pros' on here boo hoo it, these cameras are pretty freaking intelligent. The vast, vast majority of the time, it'll get you a good exposure. It also allows you to control your depth of field easily too, so you can get those creamy, bokeh filled backgrounds, which are the hallmark of somebody trying to get more 'professional looking' results, but not quite being there yet. And A mode, in my mind, will always have its place in my arsenal. Heck, Joe McNally uses A mode a LOT of the time, and if it's good enough for Joe, it's good enough for just about anybody.
After I started testing out the waters of A mode, I slowly started venturing into the world of exposure compensation. Essentially exposure compensation simply takes the exposure value that the camera thinks is right, and adds some brightness or darkness (via slower or faster shutter speed when you're in A mode), as you tell it. So, let's say I'm in A mode, and I take a shot, and I think "hey, that's a bit brighter than I think it should be." Well, just dial in a little bit of negative exposure compensation and bam, you're controlling things a bit more.
However, I sort of began to notice a few things about my A mode shooting. First, using A mode with exposure compensation can be sort of annoying in certain conditions. SO lets say I'm taking a photo of a group of friends. Let's say that I dialed the perfect settings in for them using exposure compensation. Snap it, great. Next, another friend, wearing all white jumps into the photo. It's fairly bright daylight and the guy is wearing all white. This is going to confuse the camera's brain (because, after all, who would wear all white?), and it's going to cause the camera to throw your exposure off, as it tries to tone down that bright white. It might fight through and recognize faces (these things are smart) and hang on to the proper exposure for the faces, but it might not. And this is just one example, there are all sorts of scenarios where the camera gets fooled into changing your exposures, when you didn't want them changed. It's somewhat possible to work around this, but it's kind of a pain, and unreliable anyway. A second thing I noticed about A mode was that it was shaping how I viewed exposure. Because I had gotten so used to shooting in it, I sorta began to subconsciously think things should look that way. What I mean is that shooting in A mode made me start thinking like the camera. And I was producing a lot of good, but not great shots. Everything looked quite okay, but nothing stood out. Because in order to stand out, you can't do what everybody else is doing. And that's what A mode does. It makes your exposures look like what everybody else's exposures look like. Also, about this point in time I started working in a studio, where your lights aren't TTL, and thus you are FORCED to go manual.
It's very easy to get comfortable with A mode. It's especially easy, because when you first start with manual, your shots will usually look worse than they did when you were shooting in A mode. You feel like you're taking a step backwards, not making some great leap forwards. And often times you'll sorta just say "well, I was getting better shots in A, let's just go back to that for the moment, and learn M another day."
Luckily for me, I was more or less forced into shooting M mode. I had to learn it. Granted, shooting manual in a studio with big lights is a different thing than shooting a fluid event in manual. In a studio you're usually going to light meter. But simply being forced into it at all really took a lot of the fear of it away.
A related side-point here about camera bodies. If you have one of the beginner cameras that just have one control wheel, really you probably should just stick to A mode. Those cameras aren't really made to shoot manual. Manual is a PITA if you have to hold down a little button to adjust shutter speed. Really in those cases you might as well just use exposure compensation when you need to. In order to effectively shoot manual, you need a dedicate wheel for both aperture and shutter speed. As Zack Arias has said, he could absolutely do an editorial shoot with his son's T2i image quality wise, but he'd end up smashing it against the wall because of the single control wheel. If you shoot manual, you should have a body with dual control wheels. So, my job forcing manual on me, and getting my D7000 with dual command wheels were really the two things that paved the way for me to shoot manually effectively. And I don't mean any of this to belittle models like the D3100, D5100T1i or T2i. They're fantastic cameras, really. I took what are still some of my favorite photographs with my humble little D3100. And really, there's nothing wrong with shooting in A mode, you occasionally have to work a bit harder, and you have to make a conscious effort to not let the camera dictate how you shoot, but it can be done. Especially if you're not shooting professionally and crunched for time, and thus can fiddle with things a bit more.
Now, when I first started shooting in manual, I didn't actually think through the part I mentioned earlier about not letting the camera dictate how you shoot. Because at first, when shooting on my own outside the studio, what I was doing was constantly just centering the in-camera light meter on matrix or center weighted metering. A huge number of photographers shoot this way, that is in manual, but always centering the in camera light meter. These photographers are also the ones who tend to belittle people who don't shoot in manual the most. They are prone to statements like 'I'm not a hobbyist, I shoot in manual' or "if you want to be a serious photographer, shoot in manual'. What they fail to understand is that when you always center the in camera light meter, you're shooting in A mode, you're just turning the dial for the camera, instead of letting it do the work. If the difference between hobbyist and serious photographer is simply turning a knob, well, then that's no difference at all.
So, if you can't just use your in camera light meter, then how the heck are you supposed to shoot in manual? Do you have to have such good eyes that you can look at a scene and just know it needs ISO 200, f/8, SS 80? THough some photographers can do that, that's not necessary at all. What is necessary is knowing what your in camera light meter does, and how to use it. First, I'm of the opinion that if you're going to shoot in manual, you need to shoot with your in camera light meter set to spot mode. In spot mode your camera is essentially going to tell you how close whatever it is the little dot is pointing at is to middle grey. Middle grey is exactly what it sounds like, the exact middle value in the camera's grey scale. When a scene comes out to about an average of middle grey, it tends to be considered 'properly exposed' Things are a bit more complicated than that, but that's all we need to know for now. The second thing you need to know is what you want your exposure to look like. Of all the things that go into shooting manual, this is the only one that's actually difficult. Because it's an artistic decision. If you just want a standard looking exposure, just shoot in A mode, or even P mode. There is nothing wrong with that when a shot calls for a standard exposure. You might have to give a touch of exposure compensation here and there. But manual is what you need when you don't want a perfectly standard exposure. When you want to create something with light. Because while these modern dSLRs are great at many things, they aren't yet creative. They can't look at a scene and decide that you want a single highlight of the person's face, with quick fall off and dramatic shadows everywhere else. It can't see that you want a dark and ominous sky and silhouettes. It has no idea that you want to shoot an edgy high key portrait with one single spot of dark that is a pool player holding an 8 ball. The in camera light meters have gotten more intelligent, especially in matrix mode, but at the end of the day, they are all about producing normal looking shots.
So, back on point, you gotta know what you want your picture to look like. Then, with practice, it helps if you roughly know what that would correspond to in the light meter. ie, you don't need to be able to see the exact values that it would take to achieve it, but you do need to know what you want in your frame to be middle gray. Then use your in camera spot meter. Sometimes you may not want anything to be middle grey, and then you need to know what rough values you want them to be on the in camera light meter.
Essentially, you have to think of the light meter as a tool that tells you how close whatever it is pointed at is to middle grey. And then you have to be able to get your exposure to where you want those various parts in relation to middle grey, based on your artistic vision. Fiddling with the buttons to get yourself there is the easy part, though that's perhaps what seems daunting to people starting off. Knowing where you want the exposure is the hard part, the part that makes you a photographer instead of just a snapshooter.
basically to give you guys an idea of what I'm talking about here, I'll post a shot I just took a few minutes ago, expressly for this purpose:
DSC_4068 (1) by franklinrabon, on Flickr
edit: D7000; 35mm f/1.8g; raw; converted to B&W in aperture (crop and conversion were only edits); f/1.8; ISO 160; 1/30 shutter
Here, there were basically three zones of light: 1) the background, which was ambiently lit; 2) the left side of my dog's face, which was lit by light reflected off my front porch floor, then through a window (porch is covered, and it's overcast, so this is essentially sunlight, thrice diffused, by clouds, by a white porch floor and by a dirty window) and the right side of my dog's face, which is lit by a Metz AF-50 speedlight, through a 24" hotshoe speed box.
Essentially my thoughts were this: First I wanted to shoot at f/1.8 for the DoF. I wanted the tip of her nose OOF, because I really wanted to push the viewer to her eyes. She has some white whiskers on her chin, and had they been in focus, the viewer would be a bit more drawn to them, being the lightest thing in the picture. Shooting a black dog is tough, because naturally the eye is drawn to light things, so you have to work a bit harder to get the viewers eyes where you want them. Next, I wanted to get the background to middle grey (the back wall is actually a dark red), I wanted just enough of the speed light to hit the wall to give it fall off towards the edges, almost a subtle vignette, but created with flash. I wanted a few highlights on the right side of her face, and I wanted the soft diffuse ambient to light her left side. I didn't want the light to be so even and flat to be boring. I wanted the contrast of varying levels of contrast. So, how do I go about this? first, I pointed the in camera light meter at the edge of the background and centered that for middle grey, then I checked the left side of her face to see if that would still get her at an acceptable level. To make the background pure middle grey, my dog would be a touch darker than I wanted, so I slowed my shutter speed just a tad bit. I guessed that this would mean I needed the flash at about 1/64. That was pretty much right, and I just left it there. The sppedlight softbox is at about a 45 degree angle, elevated about 2 feet above her head and about 2 feet back.
Essentially I started with my DoF. Set that where I wanted. Then I started figuring what shutter speed to get the ambient levels where I wanted them using the in camera light meter (remember, shutter speed doesn't do anything to flash). Then I figured out what level I wanted on my flash, by looking at the levels my correct ambient exposure gave me on the side that was going to be flashed. Then hit the shutter.
I'm not saying any of this is better or worse than anything else, that's just how I do it. And since I rarely see anything like that written around here, just thought I'd share with some new shooters, or even intermediate shooters my approach. Feel free to take whatever you'd like and discard whatever you'd like.


![[No title]](/data/xfmg/thumbnail/32/32157-d34c504b7ccf1335e959a8a2be6cfacc.jpg?1619735234)