Hiya! I just read through this thread and I'm wondering if you found any of the above advice helpful, or finally got it? I remember when I received my first DSLR, I thought I would never "get it." Slowly, I have learned a little here and there. I am by no means an authority on the subject, but I have read a lot so I will try and help you out. I am sure there are a million people who will argue with what I have said, but this is my elementary understanding of exposure, etc.
First of all, please remember that everyone (okay most everyone) on this forum holds themselves to a very high standard. They are going to hold you to the same standard. In an industry where everyone with a DLSR on "P" is a professional photographer, their whole living/way of life is being compromised by the person on latest trip home from Best Buy. Some are a little cranky, probably, but they have a right to be. They earned their stripes, and turning around and just giving them away for free doesn't settle well. So, they are making you earn your stripes. It's a good thing.
You are not going to find a one size fits all setting or set of settings that works in every situation. That's why point and shoot cameras don't work in every situation, because as much money as companies have spent on programming them to do so, they simply cannot interpret every situation. Neither can you camera's light meter. Neither can judging exposure with a histogram, or a gray card, etc. Every method, every setting, has a pro and a con associate with it. Knowing what you're looking for and how to manipulate those settings is photography. If you want to be a photographer, you need to know as much as you can and never stop learning.
So, the basics of exposure AS I UNDERSTAND THEM. Your exposure on a DSLR is comprised of three settings, ISO, Shutter speed, and aperture. Each of these have a range measured in terms of stops. Look them up, learn them, study them, memorize them, and know them in your sleep. It will make life easier later on. Anyway, the combination of ISO, Shutter Speed, and aperture are what make your exposure. Each of these three things effects your image in different ways. How you interpret these settings is what makes a photo your own. Photos are a creation, not simply comprised of focal length and composition, but exposure.
ISO- ISO measures how sensitive your camera's sensor is to light. Higher ISOs are more sensitive to light, lower ISOs are less sensitive. The lower an ISO is, the less noise you will see in your images, however the more light you need in order to capture the image. Personally, I strive to get my ISO the lowest it can be in any situation to make sure my images are of the highest quality they can be. Higher ISOs allow more light in and more wiggle room with your other settings, but you sacrifice image quality and get grain in your images. Grain does not translate to crappy images, by any means, but for my personal taste, I prefer less.
Shutter speed- pretty self explanatory. Your camera's shutter (or curtain) opens and closes to reveal your camera's sensor. How fast it open and closes determines how much light hits the sensor. Someone earlier mentioned the reciprocal rule....never shoot with a shutter speed slower than 1 over your focal length, i.e. if your at 105 you need to be at 1/125 of a second, UNLESS you have a tripod. This will minimize camera shake. It can get tricky when you're shooting with a variable focal length lens. So, what I do is remember what lens I have on my camera, and keep it in the back of my head that I cannot go under 1 over my longest focal length. For example, I have an 80-200 lens. I can shoot at 80 mm or 200 mm, however, I try to keep my shutter speed above 1/200 for that lens. I could go lower if I'm only at 80mm, but I don't always have time to think about it. A shutter of 1/200 minimizes blurry images later on. Look at your lenses and determine what focal lengths they are before you shoot. Lens choice is another part of photography....so know your gear and what you're using BEFORE you push that button. Faster shutter speeds require more available light, and slower speeds require less.
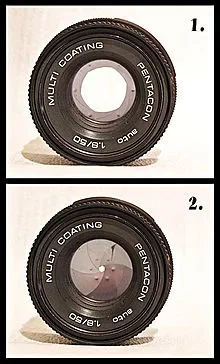
Aperture- Aperture is what determines how much of your image is in focus and how much is blurry (depth of field). How you use aperture in your exposure is part personal choice and part necessity. Lower apertures make more of the photo fuzzy, and are great for portraits or a single subject (with the exception of macro). Higher apertures keeps everything crisp and is great for landscapes. I prefer to take photos of people, so my aperture is usually around 2.8-5.6. Lower apertures require less light, higher apertures require more light to get that detail throughout the image.
So, how do you know when all of these things have aligned to provide you with a proper exposure? The easiest/readiest way is through your camera's light meter. However, your camera's light meter is not fool proof. So, a working understanding of using things like a gray card, histograms, and a hand held light meter will help you A LOT. Not every method is foolproof, and knowing what methods to use when puts you on the way to perfecting your photography skills. Still, you need to know how your in camera light meter works. Camera companies spend a ridiculous amount of money programming camera's pattern or matrix meters to correctly interpret situations. There are three basic settings on most DSLRs that have to do with how your camera's meter reads light. Matrix, or pattern, is kind of like the automatic setting. It takes a look at what the entire sensor is seeing and tries to find a patter that it fits. It then gives you a reading of ALL the light the sensor sees based on that pattern. Spot metering meters where that red auto focus dot is pointing to. Center weighted gives more importance to the center of the image. For me, I usually use a combination of matrix metering and histogram reading.
Your camera's light meter can be fooled. Why? Because if measures the amount of light reflecting from your subject. Remember science class where we learned that the colors we see are relative to different wavelengths of light (or something like that). I remember it as if I see purple, an object is absorbing all but the purple waves of light, so I saw purple. I also remember that white is ALL colors, and black is the absence of color (or light). So, your camera is measuring the light coming OFF of what you're pointing. White is all light, black is no light. So, how does this effect your settings? Well, if you're taking a picture of your kiddos outside in the winter, playing in snowdrift, your camera sees all that white and tells you that you are way over exposed. However, if you take the picture, your kids' faces are shadowy and the snow is gray. You and your camera's light meter were fooled. So, THINK about what your camera is seeing. Are your subjects on white? Black? How is your camera seeing the image? Do you need to override your light meter and expose a little higher (as in the snow scenario)? Consequently, your histogram would also be fooled in this scenario, so the appropriate way to meter would either be a hand held meter (which measures the light falling ON the subject) or spot metering a gray card.
SO how in the hell does one apply all this practically? This is how I do it.
#1 I determine what lens I'm using. I know I cannot go below 1/ the highest focal length if at the highest focal length, so I set my shutter speed as close to 1/ the highest focal length I can get.
#2 I set my ISO to 100 to see how close i can get to it.
#3 I think about what kind of depth of field I want (how much I want fuzzy) and set my aperture. If I know I'm in a low light setting and depth of field isn't incredibly important I will go down to 2.8 right off the bat.
#4 I take a reading through my camera's light meter and see what it looks like.
#5 I look at the situation to see if I am photographing a scenario that would typically fool my light meter, i.e. snowy scene, backlit subjects, etc. and try to remember to compensate for that on my camera's light meter. If I need more light, I start to bump my ISO by the amount of stops I am underexposed (this is where it is helpful to know the stops by heart). If I am over exposed, I know I can either raise my aperture or my shutter speed.
#6 I take the photo and look at it on LCD to be sure there aren't any obvious exposure issues.
#7 I look at my histogram because my LCD might be set too bright or dark and is therefore fooling me into thinking my image is lighter/darker.
There you have it....
I am no professional, but this is what works for me. Hope it helps.
-Rach





 :waiting:




![[No title]](/data/xfmg/thumbnail/32/32782-7f10503454a2a8eeff8b554e3b081c86.jpg?1734162474)
![[No title]](/data/xfmg/thumbnail/38/38265-4b75e7e05f8bf906800580ac7f7ddf60.jpg?1734172156)