Hypnothesis
TPF Noob!
- Joined
- Jun 24, 2012
- Messages
- 13
- Reaction score
- 0
- Website
- www.duffieldindustries.com
- Can others edit my Photos
- Photos OK to edit
<Cross-posted thread close, link removed. Per the TPF FAQ: "Do not cross-post messages in multiple forums in an effort to gain attention".>
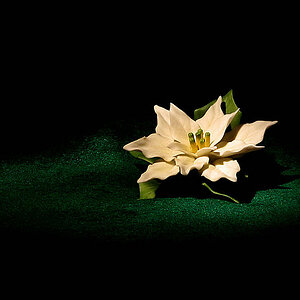
This flower was shot at night. I had little option but to do so because these last 24 hours tops. I had to use a car's headlights as the light source, and the parking light introduced significant yellowing that had to be undone. Here are 3 images that resulted:

The above was the first image done, in which most effects were done in Photomatix. I tried very hard after Photomatix to color correct in Photoshop. I got the flower back to white, at the cost of reddening everything. Since this shot was quite sub-par (beyond an artistic quality), I decided to redo this.

This one is a redo in Photomatix, which resulted in an over saturated image. The flower is white in real life, but the parking light turned the scene yellow, and I repaired this by duplicating the image, desaturating it, layer masking the b&w, and 'painting' saturation back on by painting white to the mask. This came out better, but the deghost wasn't that great, so...

I decided to do it over again, this time skipping photomatix and building the HDR manually using layers. -3, -2, -1, and 0 got "lighten" over a black layer, and +1, +2, +3 got "multiply*" on top of the other layers. Since +2 and +3 were out of skew/rotational alignment, I cheated and used Gaussian blur on those layers, which I think softened the lighting of the upper exposed layers. I wanted to stay away from too much 'local contrast' and detail on this image, instead opting to make a highly informative image with some dynamic range.
If I were to do this over one more time, it would be to perspective warp +2 and +3 to match over the rest to avoid the blur. It may make this image slightly sharper.
*EDITED: darken -> multiply
Last edited by a moderator:

![[No title]](/data/xfmg/thumbnail/40/40284-f59f6230f0d5b9eacf977f8b0392f087.jpg?1619739407)