What's new

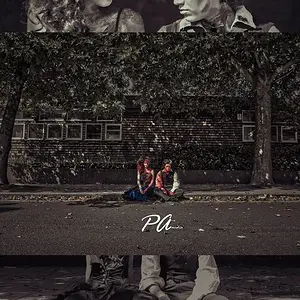
Portrait in the Studebaker

a selective color adjustment layer to mess with each of the color channels,

Holy ****, you just changed my entire f**king world. :lol:

Can I ask you another question concerning the selective color adjustment layer (not about your image specifically... just about that adjustment layer in general.)
Certainly!

K... So as I understand it, just from messing with it just now:
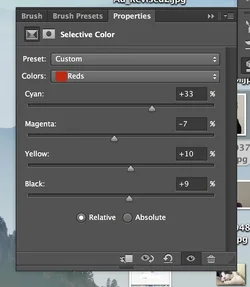
$Screen Shot 2014-07-12 at 4.44.53 PM.webp

"Colors" is the specific color channel you're manipulating, correct? So as my screen shot has it set, any of those sliders I move will effect JUST the reds in the photo... yes?

So if I slide the "Cyan" slider over to the right it adds more Cyan to the reds? And if I slide it left, it takes cyan out of the reds?

(And when I say that out loud, that kind of screws with my head a little, cause I'm thinking, "How can you take cyan out of red? Red is red... not cyan."), but that's what I'm seeing happen. Or something. ha.

And what does setting "relative" vs. "absolute" do? Do you prefer one over the other for any particular reason?

Dude. I don't think you understand. I've opened that panel by accident, so many times. I never understood what the hell to do with it, until you posted these images, and wrote that one little statement... and you've totally rocked my effing world.

I'm literally freaking out over here.

This is going to help me achieve SO MANY THINGS that I have been attempting to do for MONTHS. (And sometimes have achieved, but painstakingly so).

I could freakin' hug you right now.
 
Holy ****, you just changed my entire f**king world. :lol:

Can I ask you another question concerning the selective color adjustment layer (not about your image specifically... just about that adjustment layer in general.)
Certainly!

K... So as I understand it, just from messing with it just now:

View attachment 79217

"Colors" is the specific color channel you're manipulating, correct? So as my screen shot has it set, any of those sliders I move will effect JUST the reds in the photo... yes?

So if I slide the "Cyan" slider over to the right it adds more Cyan to the reds? And if I slide it left, it takes cyan out of the reds?

(And when I say that out loud, that kind of screws with my head a little, cause I'm thinking, "How can you take cyan out of red? Red is red... not cyan."), but that's what I'm seeing happen. Or something. ha.

And what does setting "relative" vs. "absolute" do? Do you prefer one over the other for any particular reason?

Dude. I don't think you understand. I've opened that panel by accident, so many times. I never understood what the hell to do with it, until you posted these images, and wrote that one little statement... and you've totally rocked my effing world.

I'm literally freaking out over here.

This is going to help me achieve SO MANY THINGS that I have been attempting to do for MONTHS. (And sometimes have achieved, but painstakingly so).

I could freakin' hug you right now.
Yay! I'm glad I was able to help! The selective color adjustment layer rocked my world too when I first learned how to use it.

I think the best way to get to know that tool is to experiment. Go through each color channel, and slide each slider left and right and see what you get and what you like. I think you will have particular fun with the Whites, Midtones and Blacks channels. And I leave it set to "relative".

What I recommend is to adjust the opacity of the adjustment layer after you are finished with it. It may look great the way it is, but it could look even better with a subtle reduction of the effect. Also I would recommend keeping the selective color adjustment layer underneath your curves adjustment layer that way the tones are affected by the curves adjustment as well, and to also make sure that if you reduce the saturation with a hue/saturation adjustment layer (and I highly recommend you do), make sure that you keep the hue/saturation adjustment layer underneath the other adjustment layers in your layer order, that way it will only affect the saturation of the background image and not affect any of the other adjustment layers.
 
Certainly!

K... So as I understand it, just from messing with it just now:

View attachment 79217

"Colors" is the specific color channel you're manipulating, correct? So as my screen shot has it set, any of those sliders I move will effect JUST the reds in the photo... yes?

So if I slide the "Cyan" slider over to the right it adds more Cyan to the reds? And if I slide it left, it takes cyan out of the reds?

(And when I say that out loud, that kind of screws with my head a little, cause I'm thinking, "How can you take cyan out of red? Red is red... not cyan."), but that's what I'm seeing happen. Or something. ha.

And what does setting "relative" vs. "absolute" do? Do you prefer one over the other for any particular reason?

Dude. I don't think you understand. I've opened that panel by accident, so many times. I never understood what the hell to do with it, until you posted these images, and wrote that one little statement... and you've totally rocked my effing world.

I'm literally freaking out over here.

This is going to help me achieve SO MANY THINGS that I have been attempting to do for MONTHS. (And sometimes have achieved, but painstakingly so).

I could freakin' hug you right now.
Yay! I'm glad I was able to help! The selective color adjustment layer rocked my world too when I first learned how to use it.

I think the best way to get to know that tool is to experiment. Go through each color channel, and slide each slider left and right and see what you get and what you like. I think you will have particular fun with the Whites, Midtones and Blacks channels. And I leave it set to "relative".

What I recommend is to adjust the opacity of the adjustment layer after you are finished with it. It may look great the way it is, but it could look even better with a subtle reduction of the effect. Also I would recommend keeping the selective color adjustment layer underneath your curves adjustment layer that way the tones are affected by the curves adjustment as well, and to also make sure that if you reduce the saturation with a hue/saturation adjustment layer (and I highly recommend you do), make sure that you keep the hue/saturation adjustment layer underneath the other adjustment layers in your layer order, that way it will only affect the saturation of the background image and not affect any of the other adjustment layers.

Yes... when I was playing with it, I got particularly excited when I hit the black and white sliders, hahaha.

Ugh, I wanna go back and reedit ALL THE THINGS.

I have a session coming up in 2 weeks that I am going to probably unleash this adjustment layer on. -- I've had it in my head the whole time what I *want* the end result to look like, but have been apprehensive about getting it *just* right, and I think this is going to help a TON.

Eeeeeep! :lmao:

You're amazing. Thank you so much!
 
K... So as I understand it, just from messing with it just now:

View attachment 79217

"Colors" is the specific color channel you're manipulating, correct? So as my screen shot has it set, any of those sliders I move will effect JUST the reds in the photo... yes?

So if I slide the "Cyan" slider over to the right it adds more Cyan to the reds? And if I slide it left, it takes cyan out of the reds?

(And when I say that out loud, that kind of screws with my head a little, cause I'm thinking, "How can you take cyan out of red? Red is red... not cyan."), but that's what I'm seeing happen. Or something. ha.

And what does setting "relative" vs. "absolute" do? Do you prefer one over the other for any particular reason?

Dude. I don't think you understand. I've opened that panel by accident, so many times. I never understood what the hell to do with it, until you posted these images, and wrote that one little statement... and you've totally rocked my effing world.

I'm literally freaking out over here.

This is going to help me achieve SO MANY THINGS that I have been attempting to do for MONTHS. (And sometimes have achieved, but painstakingly so).

I could freakin' hug you right now.
Yay! I'm glad I was able to help! The selective color adjustment layer rocked my world too when I first learned how to use it.

I think the best way to get to know that tool is to experiment. Go through each color channel, and slide each slider left and right and see what you get and what you like. I think you will have particular fun with the Whites, Midtones and Blacks channels. And I leave it set to "relative".

What I recommend is to adjust the opacity of the adjustment layer after you are finished with it. It may look great the way it is, but it could look even better with a subtle reduction of the effect. Also I would recommend keeping the selective color adjustment layer underneath your curves adjustment layer that way the tones are affected by the curves adjustment as well, and to also make sure that if you reduce the saturation with a hue/saturation adjustment layer (and I highly recommend you do), make sure that you keep the hue/saturation adjustment layer underneath the other adjustment layers in your layer order, that way it will only affect the saturation of the background image and not affect any of the other adjustment layers.

Yes... when I was playing with it, I got particularly excited when I hit the black and white sliders, hahaha.

Ugh, I wanna go back and reedit ALL THE THINGS.

I have a session coming up in 2 weeks that I am going to probably unleash this adjustment layer on. -- I've had it in my head the whole time what I *want* the end result to look like, but have been apprehensive about getting it *just* right, and I think this is going to help a TON.

Eeeeeep! :lmao:

You're amazing. Thank you so much!

Go practice now that way you are ready for the shoot!
 
Yay! I'm glad I was able to help! The selective color adjustment layer rocked my world too when I first learned how to use it.

I think the best way to get to know that tool is to experiment. Go through each color channel, and slide each slider left and right and see what you get and what you like. I think you will have particular fun with the Whites, Midtones and Blacks channels. And I leave it set to "relative".

What I recommend is to adjust the opacity of the adjustment layer after you are finished with it. It may look great the way it is, but it could look even better with a subtle reduction of the effect. Also I would recommend keeping the selective color adjustment layer underneath your curves adjustment layer that way the tones are affected by the curves adjustment as well, and to also make sure that if you reduce the saturation with a hue/saturation adjustment layer (and I highly recommend you do), make sure that you keep the hue/saturation adjustment layer underneath the other adjustment layers in your layer order, that way it will only affect the saturation of the background image and not affect any of the other adjustment layers.

Yes... when I was playing with it, I got particularly excited when I hit the black and white sliders, hahaha.

Ugh, I wanna go back and reedit ALL THE THINGS.

I have a session coming up in 2 weeks that I am going to probably unleash this adjustment layer on. -- I've had it in my head the whole time what I *want* the end result to look like, but have been apprehensive about getting it *just* right, and I think this is going to help a TON.

Eeeeeep! :lmao:

You're amazing. Thank you so much!

Go practice now that way you are ready for the shoot!

Haha, you better believe I am.

I have some not-so-fun accounting sh*t to take care of, but the moment I'm done with that, I'm grabbing a beer and gettin' intimate with photoshop. :lol:
 
Yes... when I was playing with it, I got particularly excited when I hit the black and white sliders, hahaha.

Ugh, I wanna go back and reedit ALL THE THINGS.

I have a session coming up in 2 weeks that I am going to probably unleash this adjustment layer on. -- I've had it in my head the whole time what I *want* the end result to look like, but have been apprehensive about getting it *just* right, and I think this is going to help a TON.

Eeeeeep! :lmao:

You're amazing. Thank you so much!

Go practice now that way you are ready for the shoot!

Haha, you better believe I am.

I have some not-so-fun accounting sh*t to take care of, but the moment I'm done with that, I'm grabbing a beer and gettin' intimate with photoshop. :lol:

I'd love to see what you come up with!
 
Nice treatment, nice shot but those pants are seriously distracting.
 
I keep coming back to look at these (not only because the dude is HAWT), but because I love your processing on these.

Since you posted a Before/After, can I ask how you did this? Or is it top secret?

Lol E Rose has an Icrush lol.
 
It's a very nice photo, I really like it!!!
 
K... So as I understand it, just from messing with it just now:

View attachment 79217

"Colors" is the specific color channel you're manipulating, correct? So as my screen shot has it set, any of those sliders I move will effect JUST the reds in the photo... yes?

So if I slide the "Cyan" slider over to the right it adds more Cyan to the reds? And if I slide it left, it takes cyan out of the reds?

(And when I say that out loud, that kind of screws with my head a little, cause I'm thinking, "How can you take cyan out of red? Red is red... not cyan."), but that's what I'm seeing happen. Or something. ha.

And what does setting "relative" vs. "absolute" do? Do you prefer one over the other for any particular reason?

Dude. I don't think you understand. I've opened that panel by accident, so many times. I never understood what the hell to do with it, until you posted these images, and wrote that one little statement... and you've totally rocked my effing world.

I'm literally freaking out over here.

This is going to help me achieve SO MANY THINGS that I have been attempting to do for MONTHS. (And sometimes have achieved, but painstakingly so).

I could freakin' hug you right now.
Yay! I'm glad I was able to help! The selective color adjustment layer rocked my world too when I first learned how to use it.

I think the best way to get to know that tool is to experiment. Go through each color channel, and slide each slider left and right and see what you get and what you like. I think you will have particular fun with the Whites, Midtones and Blacks channels. And I leave it set to "relative".

What I recommend is to adjust the opacity of the adjustment layer after you are finished with it. It may look great the way it is, but it could look even better with a subtle reduction of the effect. Also I would recommend keeping the selective color adjustment layer underneath your curves adjustment layer that way the tones are affected by the curves adjustment as well, and to also make sure that if you reduce the saturation with a hue/saturation adjustment layer (and I highly recommend you do), make sure that you keep the hue/saturation adjustment layer underneath the other adjustment layers in your layer order, that way it will only affect the saturation of the background image and not affect any of the other adjustment layers.

Yes... when I was playing with it, I got particularly excited when I hit the black and white sliders, hahaha.

Ugh, I wanna go back and reedit ALL THE THINGS.

I have a session coming up in 2 weeks that I am going to probably unleash this adjustment layer on. -- I've had it in my head the whole time what I *want* the end result to look like, but have been apprehensive about getting it *just* right, and I think this is going to help a TON.

Eeeeeep! :lmao:

You're amazing. Thank you so much!


That's why I love this forum, you are always learning something great!!!
 
I'd love to see what you come up with!

Oh you will, I'm sure!

I scheduled a impromptu shoot for this Thursday that I'm excited to play with!!

Nice treatment, nice shot but those pants are seriously distracting.

Shut up, Mana.

YOU DONT KNOW ANYTHING ABOUT STYLE!

It's very grungy hipster.

He can wear whatever pants he wants.

He's beautiful.

Ain't no one staring at his pants.

:biglaugh: :lmao:

Sent from my iPhone using PhotoForum
 

Create an account or login to comment

You must be a member in order to leave a comment

Create account

Create an account on our community. It's easy!

Log in

Already have an account? Log in here.

Back
Top Bottom