Portrait shoot with Lyla - C&C please!

yetimeister

TPF Noob!
Joined
Aug 11, 2012
Messages
11
Reaction score
2
Location
Indiana
Can others edit my Photos
Photos OK to edit
Hi guys. It might be wrong of me to be posting in a "professional" thread but I could really use the advice of professionals. I just bought my SLR about two months ago and was able to get my first shoot in tonight. Her name is Lyla, a friend of my girlfriends who has some experience modeling (figured that would be easiest with my lack of experience). Anyway we took her out into a field and nearby railroad and started shooting. Again this is my first shoot and just curious what big no-nos I need to be aware of in my pictures. These were all taken today and have yet to make any changes to them in PP. All C&C is deeply appreciated!

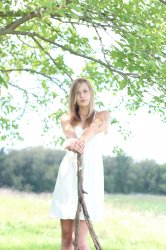
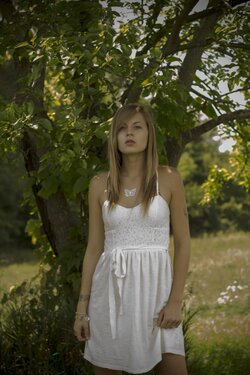
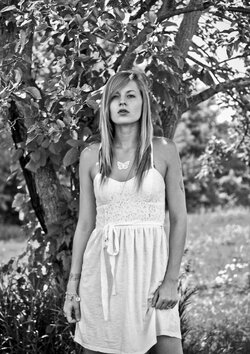
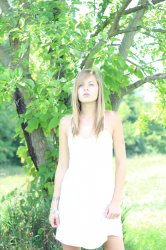
I know these first three are clearly over-exposed, is there a good professional way to correct this using CS6?
1.
$IMG_60244.jpg
2.
$IMG_60255.jpg
3.
$IMG_60300.jpg
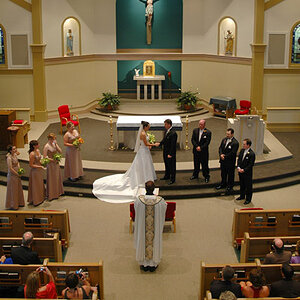
4.
$IMG_61033.jpg
 
Shots 2 and 3 appear out of focus, but might be salvageable for small, web-sized image use. The overexposed shots might be able to be improved upon if the original photos were shot in RAW mode. These are very much borderline exposures: recovering that much overexposure is going to be VERY tricky, with most cameras. The last shot has an unfortunate cropping-off of her feet, but that exposure is save-able...She's so attractive, you will definitely want to do a re-shoot to do her justice.
 
Already planning on another, we were cut short due to a nail in her tire. Bad luck! They were shot in raw though, do you know of any good tutorials on correcting the exposure on images like this? My problem with both the exposure and the focus was the fact that she continued to move so much it was hard keeping everything right. With a model that is constantly moving should I be in AF? How good does AF really work? I'm always scared to use it thinking it wont focus the right areas. I didn't initially notice the focus on 2 and 3 but you're definitely right. Thanks for the advice Darrel!
 
Well, in most RAW conversion software of today, there is Exposure and also Highlight Recovery. The first three need the Exposure slider to be "pulled back", and also to have the Highlight Recovery slider engaged (probably MAXED out actually). On half-body shots like these, Autofocus when the lens is set to f/4.8 to f/11 is usually pretty doggone good. At f/5.6, there is *usually* adequate DOF to get the entire head in focus, and the torso as well. On a moving subject, in good summertime lighting like this, a modern d-slr's AF will be, usually, VERY fast, and very sure. A bit of reading about how the AF system works, and its various modes, can be most helpful. I would give AF the advantage over hand-and-eye focusing with *most* shooters behind the camera.
 
slightly overexposed with harsh highlights. should be fixable in lightroom. cute model!
 
Darrel, you have been most helpful! I absolutely need to be reading up on AF more. I've really been cramming myself with as much knowledge of cameras as I can in these last two months, I didn't even consider understanding AF and how good it was with the assumption that MF would be better. I will be using AF next time I meet with her as well as work on correcting the exposure in the pictures from today. Thanks again!
 
After playing with the exposure, highlights, contrast, and whites in photoshops camera raw I came up with this. I also added some vignetting because I read to do so in the portrait tips on this forum :)
Clearly not finished, but a step in the right direction?

1.1
$IMG_6024022.jpg
 
I just pulled the image into Lightroom, and saw it large-sized...a couple of things...ISO 100, f/2.8 at 1/60 second...camera movement is visible...if the shutter speed is 1/60 and the lens is at f/2.8, that is a dangerous zone for focus AND for shutter speed blur on moving subjects AND for camera shake...JACK THAT ISO UP to 400 or 500!!!! Here are a couple of re-envisionings of your JPEG...a lot better image could be created from the RAW file, of that I am sure.$IMG_6024022_retouch1.jpg and here is a second image re-envisioning$IMG_6024022_retouch2.jpg. I cropped off a little bit of top space to make the composition balanced better. The original shot had too much top space. I adjusted the orange hues in the cold-tone B&W, and also the red hues, to make her lips darker. Watch that shutter speed!!! DON'T let it stray down to that 1/60 second zone--the risk of blurring is simply too great.
 
The biggest favour you can do for yourself is to immediately stop of thinking of post as a way to "correct" mistakes. Post-production is a tool to enhance your images. Yes, if you do make a minor mistake, it can help bail you out, BUT never, ever rely on the "I'll fix it in post" mentality. That said, the biggest issue with these images is, as you have already identified, the over-exposure ('though that branch growing out of her head in #1 doesn't look too comfortable). In order to get this right, in camera, you need to read up on metering and lighting.


Read your camera's manual thoroughly, especially the sections on metering modes and exposure adjustment. Then go here and read through the tutorials on Exposure, Metering and Dynamic Range. Once you've done that, stroll over to the Strobist Blog and read through their Lighting 101 section. Taking these images from blown to well exposed isn't difficult, and you won't even need to buy more equipment (although of course, we all know the more gear the better), but it will take some reading and practice.

Good luck!
 
Darrel, thanks for the tip on the shutter speed, I thought I read, or heard, somewhere that depending on the lens your wanted your shutter speed at least one notch faster (ex. 50mm = 1/60th / 250mm = 1/320th). I had no idea that the higher your aperture the more susceptible to blur you were. I kept meaning to use a tripod just to be safe, but again with so much moving I found it difficult with my cheap-o tripod. Going into it next time I will definitely be making sure it's up to 400-500, with that lighting I definitely could have afforded it! I really like the idea for the golden hue in your first picture and had read posts of yours from the past warning about dead space and definitely had that thought in mind in post production, i'm glad you pointed that out!

tirediron, that is perfect! I am in need of links to tutorials like these bad, I appreciate you posting them! I didn't think about looking into metering and dynamic range, and still not sure what I will learn from researching them.. but I definitely will anyway! I definitely try not to have a mentality of correcting in post, but with the limited skill set I have it's good to know I have the tool available. I played with photoshop and other editing tools for years when I was younger but not relying on that knowledge as a crutch if absolutely good advice :)

I couldn't be happier with the input from you guys. You should be getting paid for this - I feel extremely lucky! I will definitely be posting the result of our second shoot in the coming weeks as well!!
 
Last edited:
Nice save Derrel. Like them both.

After playing with the exposure, highlights, contrast, and whites in photoshops camera raw I came up with this. I also added some vignetting because I read to do so in the portrait tips on this forum :)
Clearly not finished, but a step in the right direction?

1.1
View attachment 17660
 
Darrel, thanks for the tip on the shutter speed, I thought I read, or heard, somewhere that depending on the lens your wanted your shutter speed at least one notch faster (ex. 50mm = 1/60th / 250mm = 1/320th). I had no idea that the higher your aperture the more susceptible to blur you were. I kept meaning to use a tripod just to be safe, but again with so much moving I found it difficult with my cheap-o tripod. Going into it next time I will definitely be making sure it's up to 400-500, with that lighting I definitely could have afforded it!

You generally grasp the relationship between shutter speed and focal length, but remember that a) this is a guideline (it has exceptions) and b) it is a recommendation for minimum shutter speed to prevent blur due to camera shake. Imagine you're shooting a still life of a bowl of fruit - this is a good starting point to get a sharp image. Experienced shooters with good form can shoot at a slower shutter speed and get a sharp image, someone with jittery hands may need an even faster shutter. On the other hand, this guideline doesn't really have any relation to blur due to motion of the subject. Often even higher shutter speeds are needed to freeze subject motion.

The large aperture doesn't make you more susceptible to blur, per se, but it does make it easier for your subject to move out of the range of acceptable focus. You may very well have a quick enough shutter to have frozen the image, but the subject has moved out of the focus range. With such a large aperture you may only have a depth of a few inches in which the image will appear sharp. For example, if you press your shutter button halfway to get focus lock on her eyes, then she rocks forward a little before you press the rest of the way to capture the image, her eyes may have left that range of sharpest focus. Yes, she is now "out of focus" because she moved, but not because she moved while the shutter was open. You can combat this by using a smaller aperture, which has a larger depth of focus (a slight rocking forward is less likely to get her eyes out of the range of acceptable focus).

One suggestion which I haven't seen yet in this thread is to read up on the Exposure Triangle. Forgive me if you have read up on it (it does seem like you've done a lot of research on your own), but that is recommended reading when someone has exposure issues. By your own admission you have overexposed the first three images. Per the Exposure Triangle, there are three things you can do to change exposure - change your shutter speed, your aperture size, and your ISO setting. Since these images were overexposed, you needed to capture less light. You could have used a faster shutter speed (which would have helped any blur issues), you could have used a smaller aperture (which would have increased your depth of field as well), and/or you could have used a less sensitive ISO setting (though you were already at 100). Learning how each affects the final image will allow you to get a proper exposure while maintaining the artistic vision you intended. Personally, for this type of shot I would first set my aperture to get the depth of focus I wanted - find that happy medium between getting my model in focus and blurring the background. Then, if motion is still an issue, I would adjust my shutter speed. After making these changes, if the image were underexposed, only then would I bump up my ISO (higher ISO settings tend to induce more noise). Conversely, there may be times you want to capture a certain amount of blur (so set your shutter speed first), or maybe you even want to create noise for stylistic reasons (so start with a high ISO setting) and adjust from there.
 
By the way - sorry, got caught up in some of the technical aspects and forgot to comment on your original question about no-nos. Overall, for your first time shooting a model I think this is a good set. As always, take these "no-nos" as suggestions and not hard-and-fast rules (there are times to break them all):

- Don't crop off limbs / don't crop at joints. As Derrel pointed out, you lopped off her toes in the last shot, but otherwise I think you did a good job of choosing where you cropped. The crop in the second one may be closer to her knees than ideal, but I don't find it that bad.

- Don't shoot a female square to the camera. This position broadens her shoulders and reduces the impact of her curves. That being said, I love the pose in your first shot - her posture and expression have some attitude, so this is an example where breaking the rule definitely works for me. Conversely, the square to the camera pose in shot 3 does nothing for me.

- Don't include so much dead space. Okay, I really wanted to phrase this as "fill more of the frame with your subject", but I'm trying to stick with the no-nos theme. As Derrel showed, you can crop the first one in a little tighter to better emphasize the model - you can crop the other three in quite a bit to emphasize the model without losing anything in the background which adds to the image. Obviously there are times when dead space is useful, such as if your model is looking somewhere off camera, but none of these fit that bill IMO.

- Don't ignore your backgrounds. You have limbs growing in/out of her head in a few, and if she had taken one step backwards (to camera right) in shot two she would have been nicely framed by the arch of the branch over her head. Shot two also has a couple mildly unfortunate horizon lines (the field/tree transition cuts right across her bust line, the tree/sky transition cuts right at her neck). None of these are particularly egregious in these shots, but keep an eye on such things in the future to really kick a shot up a notch.

- Don't always shoot vertically (in "portrait" orientation). The first three are certainly appropriate as verticals, but I feel the railroad shot would benefit from being in horizontal ("landscape") orientation. The trees and sky over her head don't really add to the image, whereas if this were horizontal you could have given her feet some breathing room on the right side of the frame. There's nothing wrong with taking two shots of each scene, one vertical and one horizontal.

- Don't confine yourself to keeping your subject centered (see: Rule of Thirds). I'm not saying you should never center your subject (horizontally, vertically, or both) as I think your first shot works very well centered horizontally and would not work as well off center. But when your whole set is centered it gets a bit stale.

Keep these things in the back of your mind but don't worry overly much about them. You've got a good start and these things will become second nature the more you shoot. Looking forward to seeing examples from your next shoot with her.
 
Ron, you are on the right track with these edits, but the SOURCE files you had to start with were already limited by their 8-bit JPEG nature...it's very,very difficult to perform the exact right kinds of editing tricks on images that need corrective measures when the original shots were exposed too much,and are only JPEG files.

This thread is a very positive thread! Some excellent comments have been posted here by various members, and the OP is taking it all in stride!
 

Most reactions

New Topics

Back
Top