"Printed On Paper" Look?

andytakeone

TPF Noob!
Joined
Jun 10, 2015
Messages
42
Reaction score
6
Can others edit my Photos
Photos OK to edit
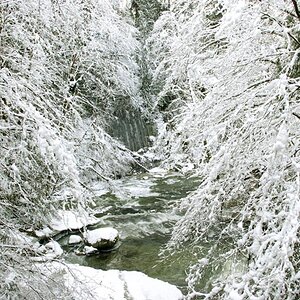
Hey guys, so whenever I come across images like this I'm always so curious as to how and why the images look the way they do. What I'm talking about is this greyish, almost grainy cast that covers certain photos (taken digitally). Particularly, I always see food photographs with this look, or in fashion books that have been printed on paper.

Here's an example of what I mean:

Food Example:
http://i0.wp.com/www.topwithcinnamo...ke-with-egg-avocado-dukkah-e1450098407305.jpg

Face Example:
http://1.bp.blogspot.com/-gdSG6S7N6xs/UyBQs9IBs4I/AAAAAAAAFHQ/WTj1FXwfD0k/s1600/cover.jpg

(I know I'm not suppose to post photos I haven't taken myself, but can I link to them? If not I'll remove the links)

I don't know if you guys can see what I mean, the effect is really subtle.
To sum it up in one sentence, it looks like the photos were "printed on paper" and now have some new consistency and texture to them.

Is this done in post? Is the effect done in camera?

Thanks.
 

tirediron

Watch the Birdy!
Staff member
Supporting Member
Joined
Jul 8, 2005
Messages
45,747
Reaction score
14,805
Location
Victoria, BC
Website
www.johnsphotography.ca
Can others edit my Photos
Photos OK to edit
Links are 100% okay!

With respect to your question, in the food image, it looks to me like a subtle texture layer has been added in post. In the portrait, it almost looks over-sharpened. That said, there are lots of ways to achieve this look, and asking Mr. Google to check on "photoshop paper texture overlay" returned a number of results, including some free options. Assuming that you're using Photoshop, or another application capable of working in layers, than download one (or more) of the textures, and add it as a layer to the image, and adjust opacity and blend mode to achieve the look desired.
 

soufiej

No longer a newbie, moving up!
Joined
Jan 3, 2015
Messages
714
Reaction score
113
Can others edit my Photos
Photos NOT OK to edit
You might begin with Picasa (which is freeware) and try their "film grain" filter.

Picasa, however, is not a high content processor and you won't find as many ways to alter your images using it as your sole software choice. It is a very usable choice, IMO, for quick adjustments where most of the work has been done prior to placing the image file in Picasa.

Working with a processor that allows layers will ultimately be more satisfying as it will be more controllable. If you haven't yet made a decision on software though, start with Picasa and give it a try for this effect. Normally, you want to reduce the look to add a certain amount of "crispness" to the image. Adding film grain is almost counter intuitive yet can add a certain look to some images.
 
OP
OP
andytakeone

andytakeone

TPF Noob!
Joined
Jun 10, 2015
Messages
42
Reaction score
6
Can others edit my Photos
Photos OK to edit
Thanks guys, I will look into it.
 

TCampbell

Been spending a lot of time on here!
Joined
Mar 31, 2012
Messages
3,614
Reaction score
1,556
Location
Dearborn, MI
Can others edit my Photos
Photos OK to edit
The Google "NIK Collection" has a plug-in called Analog Efex Pro which lets you imitate various camera and film types. I think it's $150 -- but they'll let you use a trial (probably 30 days). But this is a "plug-in" package which works with things like Photoshop, Photoshop Elements, Lightroom, or Aperture. It's not stand-alone software and there are no plug-ins for any other editors.
 

DanOstergren

TPF Supporters
Supporting Member
Joined
Jun 2, 2013
Messages
4,311
Reaction score
3,787
Open the image in Photoshop. Make a "Curves" adjustment layer (ignore my layer that says "Dodge"):
curves_by_danostergren-d9naath.jpg

Make two points along the diagonal line that crosses the grid on the "Curves" dialogue box, on the spots I have marked with a red circle:
curves_by_danostergren-d9na87m.jpg


Pull the lower point down just a little bit; this will just barely intensify the darker tones of the image, adding a little bit of contrast which will allow you to have a more noticeable fade after the next step. Make sure you only pull it down a little; this sort of faded effect looks best only when it's done with a subtle touch:
adjust_shadows_by_danostergren-d9na8m4.jpg


In the bottom left corner of the "Curves" grid, you will see another point.
fade_by_danostergren-d9na920.jpg


Pull it up just a little bit, and you'll immediately see it create a fade effect on the image. Again, keep it subtle:
fade_up_by_danostergren-d9na98r.jpg


The last thing I recommend when using this technique is to lower the saturation just a little bit. Usually when you make any sort of adjustment to the contrast of a portrait, the red tones tend to become a little overwhelming. Lowering the saturation a little bit counters this. Once again you're going to use an adjustment layer to do this:
desaturate_by_danostergren-d9na9hq.png


Pull the saturation slider down just enough to make it so the color tones aren't so overwhelming:
desaturate_pt_2_by_danostergren-d9naag3.jpg


That's how I add a printed sort of fade to a digital photo. Again, it's very important to have a subtle touch; it's easy to overdo this look.

Before/ After
screen_shot_2016_01_09_at_2_38_06_am_by_danostergren-d9nab1i.png
screen_shot_2016_01_09_at_2_37_48_am_by_danostergren-d9nab1d.png
 
OP
OP
andytakeone

andytakeone

TPF Noob!
Joined
Jun 10, 2015
Messages
42
Reaction score
6
Can others edit my Photos
Photos OK to edit
Open the image in Photoshop. Make a "Curves" adjustment layer (ignore my layer that says "Dodge"):
curves_by_danostergren-d9naath.jpg

Make two points along the diagonal line that crosses the grid on the "Curves" dialogue box, on the spots I have marked with a red circle:
curves_by_danostergren-d9na87m.jpg


Pull the lower point down just a little bit; this will just barely intensify the darker tones of the image, adding a little bit of contrast which will allow you to have a more noticeable fade after the next step. Make sure you only pull it down a little; this sort of faded effect looks best only when it's done with a subtle touch:
adjust_shadows_by_danostergren-d9na8m4.jpg


In the bottom left corner of the "Curves" grid, you will see another point.
fade_by_danostergren-d9na920.jpg


Pull it up just a little bit, and you'll immediately see it create a fade effect on the image. Again, keep it subtle:
fade_up_by_danostergren-d9na98r.jpg


The last thing I recommend when using this technique is to lower the saturation just a little bit. Usually when you make any sort of adjustment to the contrast of a portrait, the red tones tend to become a little overwhelming. Lowering the saturation a little bit counters this. Once again you're going to use an adjustment layer to do this:
desaturate_by_danostergren-d9na9hq.png


Pull the saturation slider down just enough to make it so the color tones aren't so overwhelming:
desaturate_pt_2_by_danostergren-d9naag3.jpg


That's how I add a printed sort of fade to a digital photo. Again, it's very important to have a subtle touch; it's easy to overdo this look.

Before/ After
screen_shot_2016_01_09_at_2_38_06_am_by_danostergren-d9nab1i.png
screen_shot_2016_01_09_at_2_37_48_am_by_danostergren-d9nab1d.png

Ah, wow, thanks so much for this explanation.
And going through the effort to post a little tutorial!
It definitely achieved the look, or at least came very close as far as I can tell from my first impression.

Sorry I haven't checked this thread in a few days, but glad I decided to!
 

DanOstergren

TPF Supporters
Supporting Member
Joined
Jun 2, 2013
Messages
4,311
Reaction score
3,787
Open the image in Photoshop. Make a "Curves" adjustment layer (ignore my layer that says "Dodge"):
curves_by_danostergren-d9naath.jpg

Make two points along the diagonal line that crosses the grid on the "Curves" dialogue box, on the spots I have marked with a red circle:
curves_by_danostergren-d9na87m.jpg


Pull the lower point down just a little bit; this will just barely intensify the darker tones of the image, adding a little bit of contrast which will allow you to have a more noticeable fade after the next step. Make sure you only pull it down a little; this sort of faded effect looks best only when it's done with a subtle touch:
adjust_shadows_by_danostergren-d9na8m4.jpg


In the bottom left corner of the "Curves" grid, you will see another point.
fade_by_danostergren-d9na920.jpg


Pull it up just a little bit, and you'll immediately see it create a fade effect on the image. Again, keep it subtle:
fade_up_by_danostergren-d9na98r.jpg


The last thing I recommend when using this technique is to lower the saturation just a little bit. Usually when you make any sort of adjustment to the contrast of a portrait, the red tones tend to become a little overwhelming. Lowering the saturation a little bit counters this. Once again you're going to use an adjustment layer to do this:
desaturate_by_danostergren-d9na9hq.png


Pull the saturation slider down just enough to make it so the color tones aren't so overwhelming:
desaturate_pt_2_by_danostergren-d9naag3.jpg


That's how I add a printed sort of fade to a digital photo. Again, it's very important to have a subtle touch; it's easy to overdo this look.

Before/ After
screen_shot_2016_01_09_at_2_38_06_am_by_danostergren-d9nab1i.png
screen_shot_2016_01_09_at_2_37_48_am_by_danostergren-d9nab1d.png

Ah, wow, thanks so much for this explanation.
And going through the effort to post a little tutorial!
It definitely achieved the look, or at least came very close as far as I can tell from my first impression.

Sorry I haven't checked this thread in a few days, but glad I decided to!
No worries. It's a simple procedure to get the effect, and OSX makes it easy to make screen captures to explain the steps.
 

Most reactions

New Topics

Top