Strange hot lights on face

vivdub

TPF Noob!
Joined
Mar 14, 2015
Messages
78
Reaction score
12
Can others edit my Photos
Photos OK to edit
Hi,

I faced this issue in 2 of my shoots.
The interior was light with yellow lights.
While taking pic I made sure to set exposure such that the subject is mostly black or very lightly lit ( in order for camera to focus).

I then used flash with an umbrella, but still I got a yellow section on face.
What can be the solution to this ?

Thanks
 

Attachments

  • hot_light.jpg
    hot_light.jpg
    834.1 KB · Views: 143
Reflective surfaces reflect light. Have you ever seen the start of a TV show and the makeup person is putting powder on actors faces? That powder makes the surface not be so reflective.
You can try moving the lights so the reflection goes off somewhere else.
 
You're always going to get some specularity in a strobe exposure. You can reduce it by moving the lights closer, reducing their output and/or adding additional layers of diffusion material.
 
Hi,

I faced this issue in 2 of my shoots.
The interior was light with yellow lights.
While taking pic I made sure to set exposure such that the subject is mostly black or very lightly lit ( in order for camera to focus).

I then used flash with an umbrella, but still I got a yellow section on face.
What can be the solution to this ?

Thanks
Mixing daylight, flash, and incandescent lighting is a recipe for disaster. :oops:

To focus in low light, you can use focus lock. First; turn on the incandescent lights to focus. Then lock focus. Then turn off the incandescent lights and finish the exposure. :victorious:
 
Reflective surfaces reflect light. Have you ever seen the start of a TV show and the makeup person is putting powder on actors faces? That powder makes the surface not be so reflective.
You can try moving the lights so the reflection goes off somewhere else.

ok
So you mean that the model/subject should apply that powder on to them to reduce reflection ?
 
You're always going to get some specularity in a strobe exposure. You can reduce it by moving the lights closer, reducing their output and/or adding additional layers of diffusion material.

Thanks for the suggestion, but I didn't understood it completely.
Moving closer and farther will make the effective light source bigger & smaller, but how will it reduce this?
Can you provide more details on to it. ?
Thanks
 
Mixing daylight, flash, and incandescent lighting is a recipe for disaster. :oops:

To focus in low light, you can use focus lock. First; turn on the incandescent lights to focus. Then lock focus. Then turn off the incandescent lights and finish the exposure. :victorious:

I will try this one and make the scene completely dark.
Thanks for suggesting.
 
You're always going to get some specularity in a strobe exposure. You can reduce it by moving the lights closer, reducing their output and/or adding additional layers of diffusion material.

Thanks for the suggestion, but I didn't understood it completely.
Moving closer and farther will make the effective light source bigger & smaller, but how will it reduce this?
Can you provide more details on to it. ?
Thanks
The closer the light, the softer the light, and the less speculiarity you will have. Think of it in terms of a clear, sunny or a cloudy day. On a bright, clear day, the effective light source (the sun) is 93,000,000 miles away; the light is harsh, there's lots of specularity.... whereas on a totally overcast day, the effective light source (the cloud layer) is probably less than three miles away, and everything is evenly lit with little or no apparent specularity or harshness.
 
You're always going to get some specularity in a strobe exposure. You can reduce it by moving the lights closer, reducing their output and/or adding additional layers of diffusion material.

Thanks for the suggestion, but I didn't understood it completely.
Moving closer and farther will make the effective light source bigger & smaller, but how will it reduce this?
Can you provide more details on to it. ?
Thanks

It's all about the "angular" size of the light source. Is it a "pinpoint" source of light vs. a nice large broad area that emits light.

Suppose I have a large softbox... let's say it's 48" square (or round, doesn't matter). 48" (4') is much larger than your subject's head. So if this softbox were merely inches away, that light would be lighting up your subject's face from seemingly all directions... above, below, left, right, etc. If you were to draw an imaginary line from the top of your subjects head to the top of the softbox, and another from the bottom of your subjects head to the bottom of the softbox, those two lines would form a very large angle (probably something like 160º).

NOW... imaging pulling that softbox away... very very very far away... put it at the opposite end of a football field. So now you have a 4' diameter softbox but it's located 300' away. That's significantly less than 1º angle... in other words that "softbox" is now effectively a pin-point source of light (the Sun is about 109x wider than the diameter of the entire Earth, but at about 93 million miles away it appears as a light source which is merely 1/2º from edge to edge.).

More distance between the light and the subject makes the light source smaller and this creates stronger edges on the shadows. If the softbox is closer than you get softer edges on the shadows.

But that's only half the problem... because when you put the light closer, it seems brighter and when it's farther away it seems dimmer. The "inverse-square law" describes exactly how this works. I use a garden-hose sprayer as an analogy. Imagine a garden hose with a spray nozzle. The spray nozzle is adjusted for a nice wide spray. Hold that nozzle merely 1 inch from your face and turn it on and 100% of the drops of water are going to hit you. Move that spray nozzle 10' away and only a few drops hit you. But this isn't because there is less water being sprayed... it's the same flow rate. It's because at 10' away, MOST of those water drops are going to left, or right, or down, or fly over your head ... and only a few will actually hit your face. It's the same with light. The greater the distance, the more the light has the chance to spread out.

This means if you move the light source closer, you get a broader and softer light... but it's also brighter, so you need to de-power the light to compensate. If you pull the light farther away, you get a finer point source of light, but it's dimmer....so you need to increase power on the light to compensate.

The magic value is the square root of 2 (approximately 1.4 and for photographic purposes that's close enough). If you move the light farther by a ratio of 1.4 then the light will seem to be half as bright. If you move it closer by that ratio then it will seem twice as bright. In other words if the light was 5' away originally then 5 x 1.4 = 7' So at 7' the light will appear be exactly half as bright as when it was 5' away. In the opposite direction 5 ÷ 1.4 = 3.5 (I've rounded that value) so at about 3.5' the light will seem twice as bright as it was when it was 5' away. But if you cut the power output by 1/2 the light would appear to be the same brightness... but softer because it's coming from a broader area.

You may want to pick up a good book on lighting... you might pick up a copy of "Light Science & Magic".
 
You're always going to get some specularity in a strobe exposure. You can reduce it by moving the lights closer, reducing their output and/or adding additional layers of diffusion material.

Having the model apply less-reflecting makeup can help at times. If there is **any** skin oil, this issue will be magnified; if the model/subject has some powder on top of her foundation, that can lower these reflections to varying degrees.

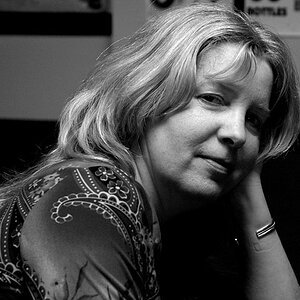
The forehead and the crowns of the cheeks quite often cause this type of specular reflection...it shows shape and dimension when it's subtle, but these are rather "hot" highlights...actually hot enough that they are approaching being what is commonly called "blown highlights". The highlights on her face and lower lip look kind of blown to me...

A much larger light source, like a 42 x 60 inch white transluscent fabric panel, or a more-diffused light, would have reduced this problem, and this is a so-called problem lighting setup for this person in this room. You did a good job though with the indoor/outdoor exposure balance!

The flash is/was just not diffused enough for the shooting situation, and the camera's exposure setting (the f/stop and ISO used, specifically) ooks a bit too generous to me, and that exaggerates the highlight brightness to a huge degree.
*****

RE-reading the OP...the yellow section on her face...hmmm...I see that...that can sometimes be an issue with over-exposure pull-back on digital files, but perhaps it's a little bit of the room light being picked up, a little bit of what's called "the ambient" (the room lighting in this case) being picked up, in what's called "underneath the flash exposure."

What was the shutter speed? If the room light was incandescent, a slowish shutter would "pick up the ambient", whereas a faster shutter would tend to "knock down the ambinet" as we say.
 
Last edited:
The closer the light, the softer the light, and the less speculiarity you will have. Think of it in terms of a clear, sunny or a cloudy day. On a bright, clear day, the effective light source (the sun) is 93,000,000 miles away; the light is harsh, there's lots of specularity.... whereas on a totally overcast day, the effective light source (the cloud layer) is probably less than three miles away, and everything is evenly lit with little or no apparent specularity or harshness.

ok I will try to keep it closer next time.
Lets see.
 
You're always going to get some specularity in a strobe exposure. You can reduce it by moving the lights closer, reducing their output and/or adding additional layers of diffusion material.

Thanks for the suggestion, but I didn't understood it completely.
Moving closer and farther will make the effective light source bigger & smaller, but how will it reduce this?
Can you provide more details on to it. ?
Thanks

It's all about the "angular" size of the light source. Is it a "pinpoint" source of light vs. a nice large broad area that emits light.

Suppose I have a large softbox... let's say it's 48" square (or round, doesn't matter). 48" (4') is much larger than your subject's head. So if this softbox were merely inches away, that light would be lighting up your subject's face from seemingly all directions... above, below, left, right, etc. If you were to draw an imaginary line from the top of your subjects head to the top of the softbox, and another from the bottom of your subjects head to the bottom of the softbox, those two lines would form a very large angle (probably something like 160º).

NOW... imaging pulling that softbox away... very very very far away... put it at the opposite end of a football field. So now you have a 4' diameter softbox but it's located 300' away. That's significantly less than 1º angle... in other words that "softbox" is now effectively a pin-point source of light (the Sun is about 109x wider than the diameter of the entire Earth, but at about 93 million miles away it appears as a light source which is merely 1/2º from edge to edge.).

More distance between the light and the subject makes the light source smaller and this creates stronger edges on the shadows. If the softbox is closer than you get softer edges on the shadows.

But that's only half the problem... because when you put the light closer, it seems brighter and when it's farther away it seems dimmer. The "inverse-square law" describes exactly how this works. I use a garden-hose sprayer as an analogy. Imagine a garden hose with a spray nozzle. The spray nozzle is adjusted for a nice wide spray. Hold that nozzle merely 1 inch from your face and turn it on and 100% of the drops of water are going to hit you. Move that spray nozzle 10' away and only a few drops hit you. But this isn't because there is less water being sprayed... it's the same flow rate. It's because at 10' away, MOST of those water drops are going to left, or right, or down, or fly over your head ... and only a few will actually hit your face. It's the same with light. The greater the distance, the more the light has the chance to spread out.

This means if you move the light source closer, you get a broader and softer light... but it's also brighter, so you need to de-power the light to compensate. If you pull the light farther away, you get a finer point source of light, but it's dimmer....so you need to increase power on the light to compensate.

The magic value is the square root of 2 (approximately 1.4 and for photographic purposes that's close enough). If you move the light farther by a ratio of 1.4 then the light will seem to be half as bright. If you move it closer by that ratio then it will seem twice as bright. In other words if the light was 5' away originally then 5 x 1.4 = 7' So at 7' the light will appear be exactly half as bright as when it was 5' away. In the opposite direction 5 ÷ 1.4 = 3.5 (I've rounded that value) so at about 3.5' the light will seem twice as bright as it was when it was 5' away. But if you cut the power output by 1/2 the light would appear to be the same brightness... but softer because it's coming from a broader area.

You may want to pick up a good book on lighting... you might pick up a copy of "Light Science & Magic".


I know most of this stuff that you told, except the formula thing.
I was just not able to get how a bigger light source will fix it.
 
You're always going to get some specularity in a strobe exposure. You can reduce it by moving the lights closer, reducing their output and/or adding additional layers of diffusion material.

Having the model apply less-reflecting makeup can help at times. If there is **any** skin oil, this issue will be magnified; if the model/subject has some powder on top of her foundation, that can lower these reflections to varying degrees.

The forehead and the crowns of the cheeks quite often cause this type of specular reflection...it shows shape and dimension when it's subtle, but these are rather "hot" highlights...actually hot enough that they are approaching being what is commonly called "blown highlights". The highlights on her face and lower lip look kind of blown to me...

A much larger light source, like a 42 x 60 inch white transluscent fabric panel, or a more-diffused light, would have reduced this problem, and this is a so-called problem lighting setup for this person in this room. You did a good job though with the indoor/outdoor exposure balance!

The flash is/was just not diffused enough for the shooting situation, and the camera's exposure setting (the f/stop and ISO used, specifically) ooks a bit too generous to me, and that exaggerates the highlight brightness to a huge degree.
*****

RE-reading the OP...the yellow section on her face...hmmm...I see that...that can sometimes be an issue with over-exposure pull-back on digital files, but perhaps it's a little bit of the room light being picked up, a little bit of what's called "the ambient" (the room lighting in this case) being picked up, in what's called "underneath the flash exposure."

What was the shutter speed? If the room light was incandescent, a slowish shutter would "pick up the ambient", whereas a faster shutter would tend to "knock down the ambinet" as we say.

Well I think the problem is this only.
There were few yellow lights on top.
However, I tried to make exposure such that the subject is dark in order to cancel it, may be they were not dark enough.
Next time I will try to cancel the ambient further to see how it goes.
Thanks for helping me out.
I always see you contribute in a very detailed way to each thread.
 
Well I think the problem is this only.
There were few yellow lights on top.
However, I tried to make exposure such that the subject is dark in order to cancel it, may be they were not dark enough.
Next time I will try to cancel the ambient further to see how it goes.
As I wrote above, mixing colors of light is your biggest problem. If you can eliminate one or two non-matching light colors, you will have much more success.

Either turn off the yellow light source completely or use it entirely by gelling your flash to match the yellow light. Then close the window blinds to eliminate daylight coming in.

If you choose to use the yellow light, set your white balance to "incandescent", and put a yellow gel on your flash. Then it will be mostly one color, which you can then balance later on your computer to be the correct color.

If you are troubled by the yellow lights, and want to simply switch them off, then use some other temporary light to focus. Your camera has a focus-assist beam, so make sure that is turned on. If not, perhaps the speedlight flash will have a focus-assist beam, which might be non-white light, but your camera can still focus by that light.
 
One tip when shooting in an office like that: set the white balance to FLASH, and not to AUTO...I've seen examples/shopt my own, where AUTO WB gives a bad color rendering due to the camera "seeing only" the continuous lighting, and when thge flashes go off, the color is just not quite correct.

But, again...it's necessary to "kill the ambient" through the use of ISO/shutter speed/aperture if you want absolutely ZERO trace of that ambient light to register!
 

Most reactions

New Topics

Back
Top