amolitor
TPF Noob!
- Joined
- May 18, 2012
- Messages
- 6,320
- Reaction score
- 2,131
- Location
- Virginia
- Can others edit my Photos
- Photos OK to edit
- Banned
- #1
Most of the better photo editors have some sort of curves tool. They all work pretty much the same way, and here's how:
Every pixel in your picture has a value, right? How bright it is. Black is 0, white is something else, let's say it's 255 (but it could be anything, it's just the biggest number, the brightest value, your editor can handle). In between we have various colors and so on, but regardless of color, there's a "how bright is it" number, between 0 and 255 in our example. A curves adjustment just remaps all of those values, using, well, a curve.
Imagine the current values present in your picture, 0 to 255, strung out along the bottom edge of a square, left to right. 0 (black) is leftmost, 255 (white) rightmost. Imagine NEW, and IMPROVED values strung out along the left side of the same square, 0 (black) at the bottom, and 255 (white) at the top. Then you can draw any curve inside that box, and it'll give you a mapping from old values to new. To get the NEW value, find the OLD value along the bottom edge, go straight up until you hit the curve, then go straight left until you hit the left edge of the box. That's your new value. When you apply a curves adjustment, the editor does this for every single pixel, leaving the colors alone, but changing the brightness.
Here's a simple strip chart:

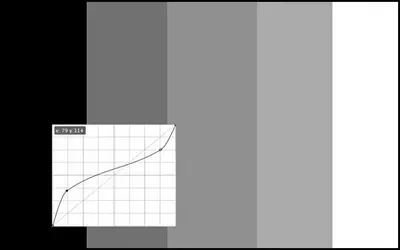
Now let's apply some curves adjustments to it:


The rule of thumb to keep in mind is that where your curve is steep, you're adding contrast. Tones that were formerly close together are farther apart in the new tones. Where the curve is flatter, you're reducing contrast -- tones that were farther apart in the old picture and pushed closer together in the new tones. Think that through until you really get it. Draw a square like in the curves tool, and run your finger around in it. Up to the curve, left the side of the box. Up to the curve, left to the side of the box.
And here's a sample picture:

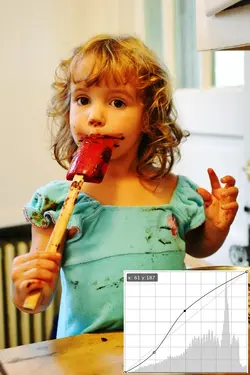
This is a simple "black point" adjustment, which simply remaps that 0 value to something higher, and then very very dark values to somewhat lighter ones, midtones to slightly lighter values, and bright values to very very very slightly brighter values, and finally leaves white absolutely alone. This creates that popular "hazy" look:

This curve opens up the midtones. It leaves the black values alone, and the white values, but all that stuff in the middle is lightened up. This can create very pleasing skin tones for caucasian skin and seems to be the basis for a lot of wedding photography processing:

This curve pushes a lot of contrast into the midtones, by making the middle part of that curve quite steep. You pay for it with a flatter curve -- less contrast -- in the darker and lighter areas. This is the starting point for that very dramatic gritty fashion look we see a lot of. Add in some aggressive large-radius unsharp mask and some burning and dodging, and you pretty much have that look. But it starts with a curve a lot like this one:

In this one I've simply flattened out the midtones to show you what that looks like. You're pushing contrast into the higher and lower tones, and flattening out contrast in the midtones. It's the opposite of the previous effect:

And, frankly, there you have it.
Every pixel in your picture has a value, right? How bright it is. Black is 0, white is something else, let's say it's 255 (but it could be anything, it's just the biggest number, the brightest value, your editor can handle). In between we have various colors and so on, but regardless of color, there's a "how bright is it" number, between 0 and 255 in our example. A curves adjustment just remaps all of those values, using, well, a curve.
Imagine the current values present in your picture, 0 to 255, strung out along the bottom edge of a square, left to right. 0 (black) is leftmost, 255 (white) rightmost. Imagine NEW, and IMPROVED values strung out along the left side of the same square, 0 (black) at the bottom, and 255 (white) at the top. Then you can draw any curve inside that box, and it'll give you a mapping from old values to new. To get the NEW value, find the OLD value along the bottom edge, go straight up until you hit the curve, then go straight left until you hit the left edge of the box. That's your new value. When you apply a curves adjustment, the editor does this for every single pixel, leaving the colors alone, but changing the brightness.
Here's a simple strip chart:

Now let's apply some curves adjustments to it:


The rule of thumb to keep in mind is that where your curve is steep, you're adding contrast. Tones that were formerly close together are farther apart in the new tones. Where the curve is flatter, you're reducing contrast -- tones that were farther apart in the old picture and pushed closer together in the new tones. Think that through until you really get it. Draw a square like in the curves tool, and run your finger around in it. Up to the curve, left the side of the box. Up to the curve, left to the side of the box.
And here's a sample picture:

This is a simple "black point" adjustment, which simply remaps that 0 value to something higher, and then very very dark values to somewhat lighter ones, midtones to slightly lighter values, and bright values to very very very slightly brighter values, and finally leaves white absolutely alone. This creates that popular "hazy" look:

This curve opens up the midtones. It leaves the black values alone, and the white values, but all that stuff in the middle is lightened up. This can create very pleasing skin tones for caucasian skin and seems to be the basis for a lot of wedding photography processing:

This curve pushes a lot of contrast into the midtones, by making the middle part of that curve quite steep. You pay for it with a flatter curve -- less contrast -- in the darker and lighter areas. This is the starting point for that very dramatic gritty fashion look we see a lot of. Add in some aggressive large-radius unsharp mask and some burning and dodging, and you pretty much have that look. But it starts with a curve a lot like this one:

In this one I've simply flattened out the midtones to show you what that looks like. You're pushing contrast into the higher and lower tones, and flattening out contrast in the midtones. It's the opposite of the previous effect:

And, frankly, there you have it.


![[No title]](/data/xfmg/thumbnail/36/36300-760519cb9a8ebbfc57cc3d1fda5dd37c.jpg?1734168623)


![[No title]](/data/xfmg/thumbnail/36/36303-10b1a386a9a00cf90fb7605d2d2c48c1.jpg?1734168634)


![[No title]](/data/xfmg/thumbnail/32/32163-b5a5e5cde131a9d14df7f164ab9cb8ab.jpg?1734161046)
![[No title]](/data/xfmg/thumbnail/34/34137-37e6e29a844c1214e5b14ce322c7b716.jpg?1734164686)
