What's new

Nikon 55~200 AFS

When this is over, and it will be soon. I think I am going to post an internet blog on how to photograph hand bags. There's a lot on food photography, and other products but nothing on purses.
I have read a couple of articles on how to manage highly reflective products, but have not found anything specifically relating to leathers etc.
 
Ok guys, i think I have found the root of confusion, and the error, not leading to sharp photos.
I have been trying to make my shutter speed faster. My objects are not moving, they are bags.
To make matters worse some guy (That i could strangle if i could) in this forum suggested I use nothing slower than 1/60.
I was getting dark images and everyone was marginally out of focus. Some were more out of focus than others, but they were not 100% sharp.
To make matters more difficult I was cranking up my exposure setting to +2 +3, trying to compensate for a dark image.
Then, we all assumed that this was the lights, not enough light, we also assumed that the 18-55 and the 55-200 were crappy lenses, and I needed a prime.
The problem is that when i received the primes (yes.. I have 3 of the little buggers here) A 40mm a 50mm and the 60mm. These primes were behaving the same identical way as the cheaper lenses.
Today, by chance, or act of rage, I went in the other direction with the S values...S 0.5 and slower. I set exposure compensation at 0.00, and I always shoot at 100 ISO because i am phobic about noise.
The f stops on bags HAVE TO BE in between 6~11. Any low F stop, 1.8 or thereabouts, makes 99% of the bag be out of focus.
Now every image on a SLOWER S is OVERLY exposed, but it's razor sharp. All i have to do is lessen the exposure in the RAW software, and voila!!.
Now, as to why using a slower shutter speed is giving me crispy images as opposed to using a faster one which gives me blurry pictures, I have no idea why, but there must be some logical explanation. Not only is the bag over exposed, but to my delight, the background is pure white also.
Now, I need to understand how to take a normally exposed picture and have it sharp too.
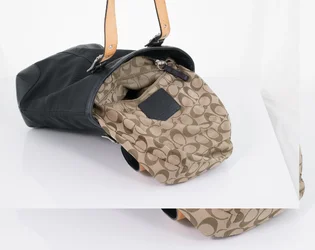
Here is the picture, not yet retouched. This is what the raw file looks like. I know it looks awful, but at least its razor sharp.

Please feel free to come and strangle me anytime you wish. I suggest you pack a lunch, it will no doubt turn into a very long day for you.


Sent from my N9518 using Tapatalk

It's a figure of speech, however, you have no idea how much grief this has caused. I know you were trying to do good. I was convinced it was the lack of light and the cheapo lenses also. The important thing now is to understand why higher shutter speeds are giving me a blurry image, and slower shutter speeds are giving me crisp over exposed images.
The grief has been entirely self imposed. You bought a bunch of equipment that might make things easier but in truth was never really needed. Had you raised the iso properly and used the 1/60 as a starting point, then abandoned this ridiculous methodolgy of viewing your pictures in a way that will never be seen by the people actually viewing them the results would have been fine.

Instead you insist on cherry picking only a small portion of the advice and overriding key elements needed for proper exposure because you were too stubborn to listen or even try it.

So now you've invested in 3 other lenses and a bunch more lighting when you could have been getting results like you wanted without any of that if you'd just been willing to give it a try.

That's exactly why I gave up responding too this thread, it became pretty obvious you had it in your head that you weren't going to listen and continue to do things your way even though they weren't working.

In short, don't blame the bad tacos on the recipe your given when you decided to switch the onions for maple syrup and the peppers for chocolate chips.

Sent from my N9518 using Tapatalk
 
The only advice I received was :
1. Buy better lenses
2. Use strobes (I.e. add light) as opposed to continuous light.
3. Read the book "light science magic"
4. use fast shutter speeds 1/60 +

I did 1,3 and 4, and none of these solved the problem. I am reading the book, however have not yet pulled the trigger on strobes, because I am in the learning process still on which to buy, how many to buy, where to position them, 200watts, 300watts, or 400 watts?, which remote triggers to buy, etc etc. I am sure that adding strobes would allow me to shoot at 1/60 and faster, and have a razor sharp image, but for the time being, I have to do what I can with the current setup. If there is any advice I have forgotten that was important, please refresh my memory.
 
NO, I raised the ISO. IT WAS NOISY, horrible, anything above 200 ISO on these bags is horrible, and if you perform a dust and scratches in photoshop it kills some of the noise but reduces sharpness.
The variables that will never change on these bags is F (6~11) depending on the position of the bag.
And ISO 100 or 200.
The lenses, the lights, moving the house to the left a little...that can all change.
 
In fact, let me post a pic at 1/60 with a high ISO, the noise is gonna hurt your eyeballs
 
When this is over, and it will be soon. I think I am going to post an internet blog on how to photograph hand bags. There's a lot on food photography, and other products but nothing on purses.
I have read a couple of articles on how to manage highly reflective products, but have not found anything specifically relating to leathers etc.
Please, no.
 
OP in a few months, if you stick with this that long, I suspect that you're going to realize just how right Mr. Robbins is and just how wrong you are.
 
Robbins, Ummm, pardon, me,
actually, here is a shot taken with my maximum amount of lights (RIGHT UP AGAINST THE BAG) at 800 ISO, and it's not noisy at all. Also something else is happening, the metal parts are not reflective and "blown out", as they usually are. There are no reflections? Hot spots?
F9 1/60 ISO 800 1/60S @50mm.
I have not ventured past 800 ISO, but I will. Any other advice?
 

Attachments

  • test small2.webp
    test small2.webp
    274.1 KB · Views: 110
OP in a few months, if you stick with this that long, I suspect that you're going to realize just how right Mr. Robbins is and just how wrong you are.

I realize it NOW, a few minutes later. The problem is that I had tried high ISO and got noise...but just now there's no noise whatsoever...not even at 100% in photoshop
 
I think for my current lighting system I cannot go over ISO 800 @ 1/60~1/80. I just tried a shot at iso 1600 1/125, and the noise is apparent. Now I have to find the sweet spot (with my current lighting system).
So, with strobes, would the ISO 100 at 1/60 work?
Currently, ISO 800 at 1/60 i'm getting a good result without the strobes.
My questions is would the shot look much better with strobes at 100 ISO f9 1/60 @50mm than ISO 800 F9 1/60 @50mm that I am forced to use because of the continuous lighting?
 
OP in a few months, if you stick with this that long, I suspect that you're going to realize just how right Mr. Robbins is and just how wrong you are.

I realize it NOW, a few minutes later. The problem is that I had tried high ISO and got noise...but just now there's no noise whatsoever...not even at 100% in photoshop
Because you didn't have enough LIGHT. Everything, EVERYTHING, to do with photography revolves around light. Noise is more prevalent in shadows or underexposd areas so if you have lots of shadows at even moderate ISO it's possible you'll get some noise.

Light fall-off is based on the inverse square of the change in distance. If you move your lights from, say, 2' from the subject to 4' from the subject the change in the amount of light is 1/(4-2)^2 or 1/4. If you move them from, say, 2' to 8' then the change in the amount of light is 1/(8-2)^2 or 1/36 as much light. You were insistent on being 8'-10' away from the subject and using a long focal length, so you had very little light at the sensor. You were insistent on having your lights 8' or so from the subject so you had even less light to work with.

Look at your subject before you trip the shutter. If you see problematic reflections then you need to shift your lights because the reflection won't go away when you trip the shutter. Likewise, if you see areas of dark shadow and are shooting at relatively high ISO you will likely get noise so, once again, shift your lights slightly.

Set your exposure so that you just barely keep from overexposing the highlights. Then reduce the exposure in post processing so that it looks correct. This is called "Exposing To The Right" or ETTR (Google it) and it will help generating noise in the shadow areas.

Finally quit worrying about pixel peeping. You're getting images that are probably 4,000 pixels wide and normal size for internet use is 800 to 1000 pixels wide. The majority of the lack of sharpness that you think you are getting will be nothing compared to the lack of sharpness when the image is reduced in size.

Your ability to accept criticism is admirable, I will give you that. Most people on this forum would have been throwing a fit and calling people names by now. I've seen it a hundred times at least. Stay with it and you'll get the results you want, but at the same time you really need to lower your requirements to a reasonable level.
 
Yes indeed, I noticed that going from an Image 300 ppi at 15" to a smaller image (normally 3"x5") I use, needs an additional unsharp mask after reduction.
I will definitely study the ETTR.
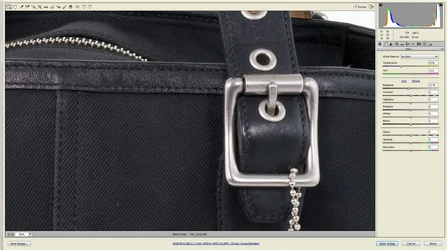
here is the best I can do for now, I can see the noise on the buckle, but other than that the image is quite sharp. Very big progress.
 

Attachments

  • ISO800.webp
    ISO800.webp
    528.8 KB · Views: 98
HELP PLEASE!!
Set your exposure so that you just barely keep from overexposing the highlights. ??

How? Is this done with the exposure compensation stops? Or the S number stops? Do you mean in the "view finder" the bag needs to be slightly over exposed before i take a shot? Or in the picture after the shot is taken?
I can't find the graphs on my Nikon 3300? The ETTR graphs? Where are they? They look like the "levels" feature we have in photoshop? But where are they in the camera?
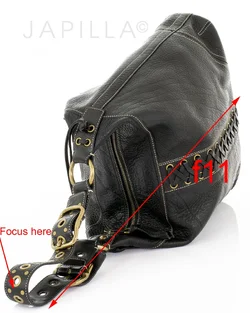
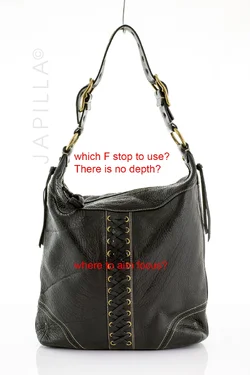
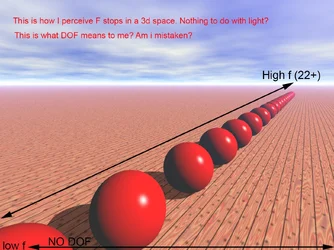
To make matters worse, I just learned that the F stops let in more or less light, and I was convinced F stops were only related to the depth of field in a 3d space. I thought the S Stops were the +/- light. (check the two pictures i posted)

For bags which metering should I use? I use matrix but have no idea if I should try the other two? Or what they really do?
With Robbins and Craig last night we determined I should use a higher ISO with a higher S number. I am trying to find a happy medium until I have time to understand all this. The problem is that I have to continue to photograph the bags, can't study all day.

I have a really huge question regarding F stops. I was convinced the F stops were related to the depth of field only, and not light. Therefore in my mind, I would give a higher F stop (f11 or so) if a bag was positioned in a way that you could see the depth (3d). On the other hand a bag that is positioned with no depth (facing us). Where do you aim your focus point? What would be the correct f stop to use if there is no depth?
 

Attachments

  • f11.webp
    f11.webp
    317.4 KB · Views: 89
  • whichf.webp
    whichf.webp
    260.3 KB · Views: 114
The Aperture is related to
(1) the depth of field
(2) how much light is allowed in to the sensor
the Shutter speed defines how long that #2 is allowed to occur. you have to understand all 3 ==> Camera Exposure: Aperture, ISO & Shutter Speed

another good one, check out the graphs ==> Exposure | Understanding Exposure - ISO, Aperture and Shutter Speed Explained

example of aperture settings in relation to how open it is and thus how much light it lets in ==> http://easybasicphotography.com/images/aperture_chart.jpg


Many newbies have really cheap tripods that bounce around a lot, one reason we recommend faster shutter speeds. Even the floor it is on can be a problem if you are walking/moving at the same time you are shooting. Considering you wanted super sharp, a faster shutter speed can be recommended without knowing everything in granular blood curling detail.
 
Please tell me if this is correct?
I thought F stops were depth not light
 

Attachments

  • dof.webp
    dof.webp
    338.1 KB · Views: 90

Create an account or login to comment

You must be a member in order to leave a comment

Create account

Create an account on our community. It's easy!

Log in

Already have an account? Log in here.

New Topics

Back
Top Bottom